 Battery enhancements, blackout headlight covers, and Coca Cola Crate Part 2!
This week’s update features quite a bit of work for this week. I added some enhancements to the battery to make it appear more vintage, made some custom headlight blackout covers, worked on fixing a hood clamp, and Part 2 of finishing a photo-accurate Coca Cola crate!
Pretty much most of this week’s update is shown here… the Coca Cola crate project and blackout headlight covers. So let’s get started!

As mentioned last week, I got a set of casted caps that were made from a mold of an original Willard battery from a member on G503. These included vent caps, filler caps, and bridge caps. Since I have a 12 volt system, that makes finding a vintage battery tough. Currently, I have a modified flat-top group 24 wal-mart battery that looks the part. Getting these caps will make it look that much better… but they need paint!

The bridge caps are supposed to be cast, so I used a metal spray that gave a pretty good cast appearance.
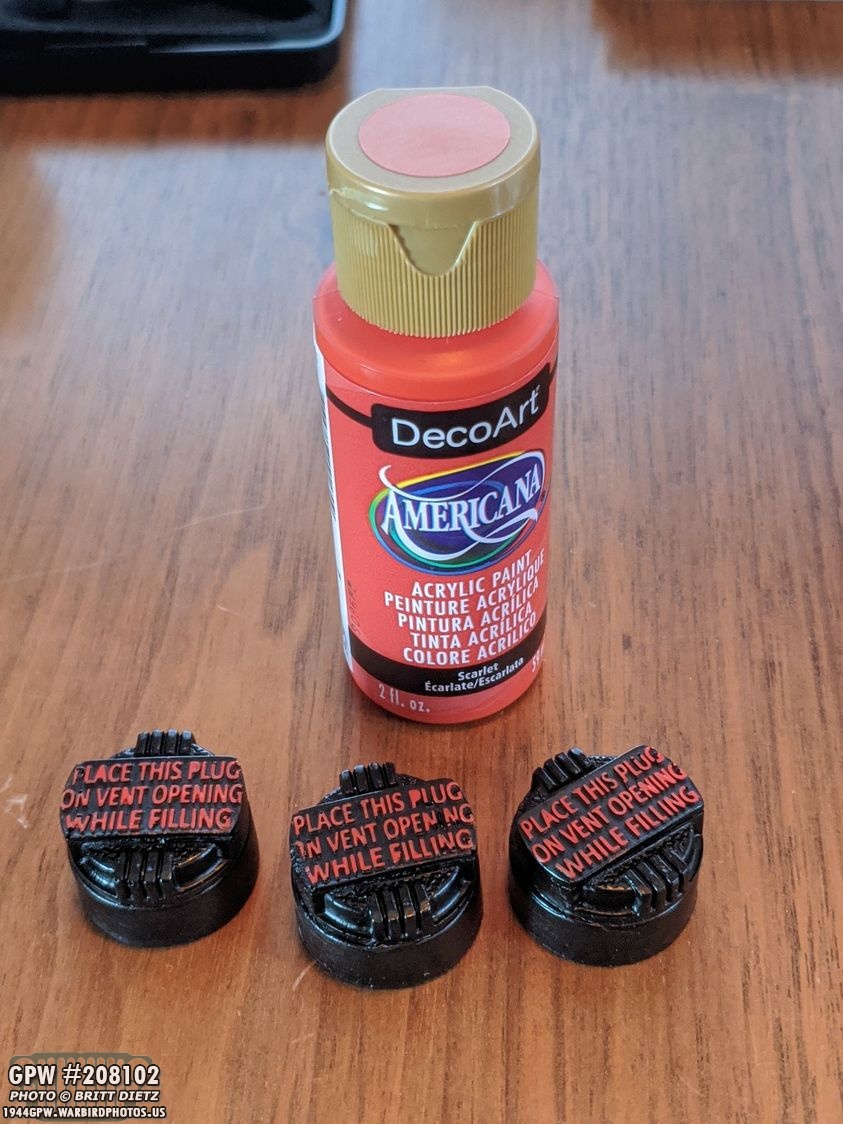
For the lettering on the top of the fill plugs, I went with a scarlet color, which I thought matched the photos of original Willard batteries well. I used a sponge brush to gently paint the letters.

Some gorilla glue made them a permanent part of the battery! I think it looks pretty good, a bit better than just a solid blacktop. It has a vintage-y look. This will hold me over until I decide to purchase a $400 12v perfect Willard replica. Till then, this $20 cap set will play the part! Of course, one of the major differences between modern batteries and the Willards is that the positive/negative terminal posts are diagonal on the Willards. Modern batteries have them on the same side, as pictured here.

Here’s how it looks overall in the engine! Looks pretty darn good.

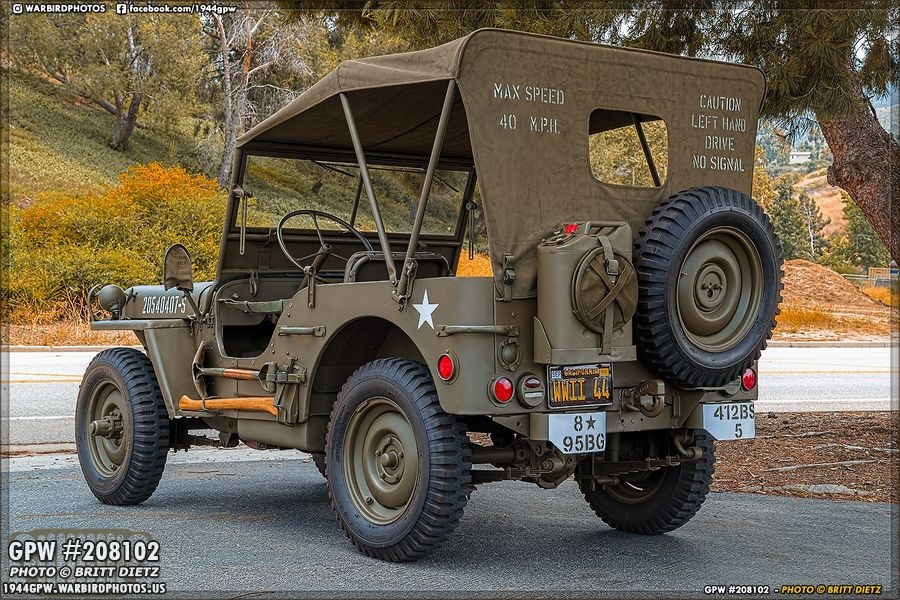
Researching Army Air Force Jeeps, and Jeeps in general, I’ve seen a few wartime photos and a few modern restorations that used the canvas headlight covers as makeshift blackout lights for the headlights. I really like this look, and it makes sense for a Jeep on a Britain USAAF airfield to have blackout headlights in case of a Luftwaffe attack. Since I’d gotten a new set of nice stamped headlight covers from Beachwood Canvas Works, I decided to use my other set I wasn’t going to use and make them as they would in WW2.
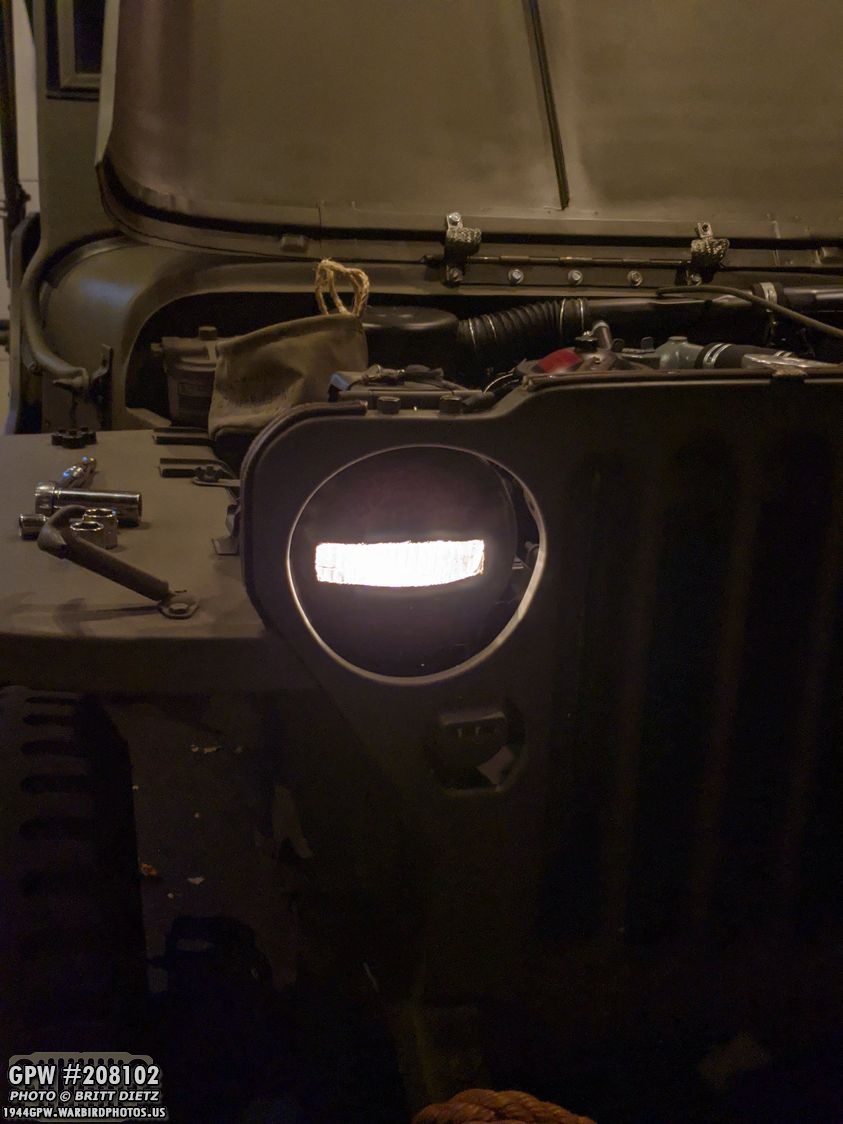
After cutting out the first one, I fitted it onto one of the headlights just to see how good/bad it looks. I have to admit, I was immediately sold.
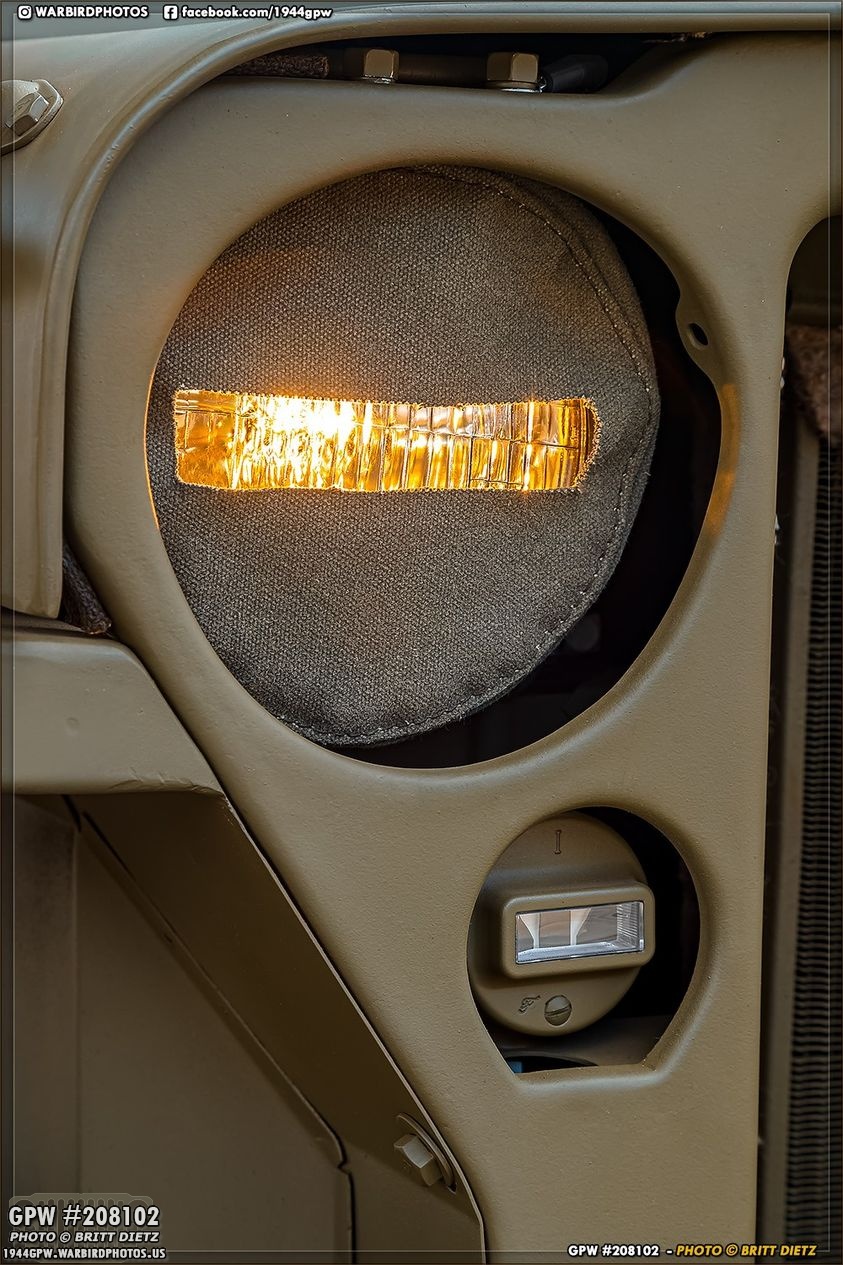
Here’s a better view in the light. Now, I’m sure you’re asking if there’s a fire danger in this. Well, first off, the headlights on my Jeep don’t get that hot, and I can typically touch the bulb even after 5 minutes of use. Also, I don’t drive at night hardly ever with the Jeep, so the headlights are not on often. But, to be extra sure, I’m planning on getting heat/flame resistant spray that I will cover the headlight covers with just in case.

With one down, it was time to get to the other one! Here’s the first blackout headlight cover done with the nice Beachwood Canvas Works stamped cover on the driver’s side.

I will say, it’s tough cutting canvas. But I managed to ger both of the covers mostly cut the same.

And here’s the test fit of both with and without the headlights on!

And here’s a look from Wednesday when I did a shoot with the Jeep. Really digging the look! Makes the Jeep look meaner for sure.

Moving on to another canvas item, if you’ve been following along with the updates for a few weeks, I attempted to restore the color in my faded canvas water bucket. It had faded to nearly khaki color (you can see the difference on the left image where the shade from the jerry can strap protected that strip from the sunshine). On the right is after 2 attempts at dying the canvas after totally bleaching it, which I covered step by step. I wasn’t too happy with how it came out, looking more greenish-yellow than canvas OD.
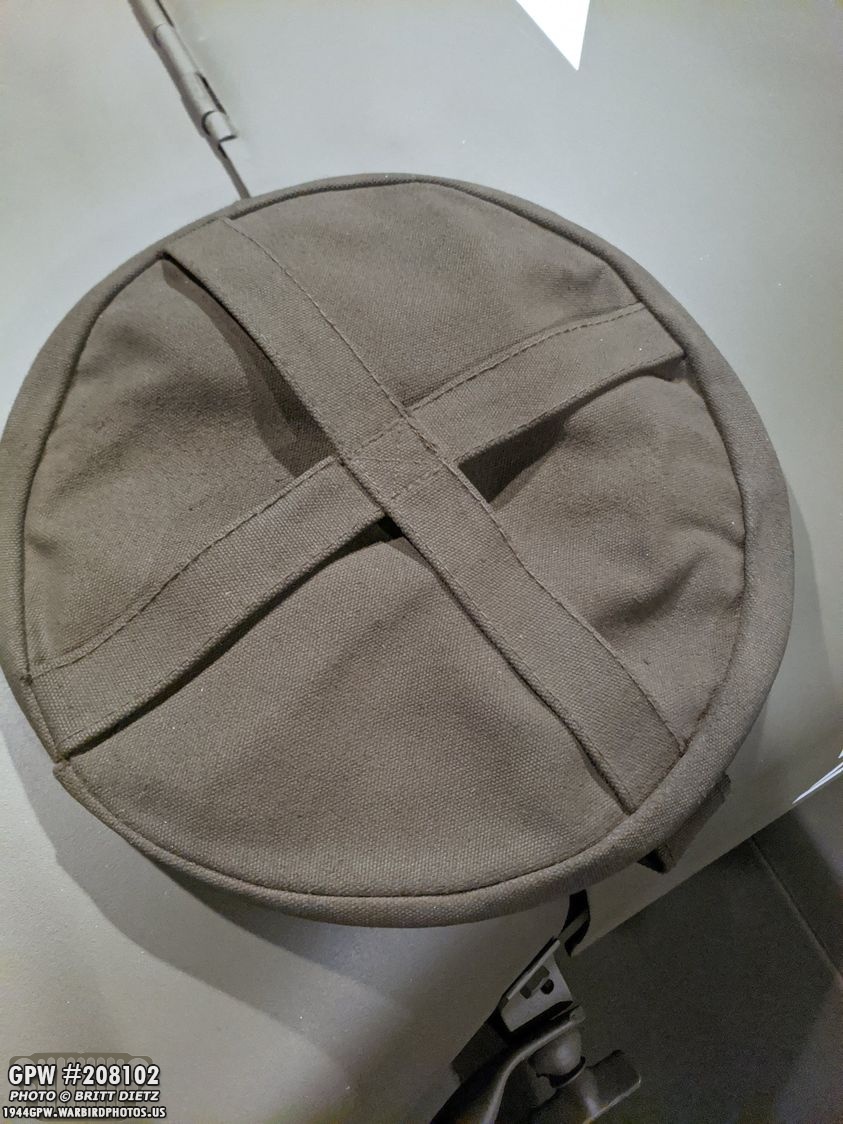
After really getting bothered by it, I thought I’d try an experiment. I took my 33070 OD Green spray from Ron Fitzpatrick Jeep Parts and held the canvas cover an arm’s length away and misted it with the spray. I tested the backside first, just in case it didn’t work. But it actually seemed to work well making it more of a OD color (and since it was misted, it didn’t stiffen up the canvas). So I went ahead and did the whole thing! Looks pretty good!

And here’s a look at the before and after. MUCH BETTER. I like how it looks now! Success!

My passenger hood latch has always had an issue. It’s slowly worn open the base so if you lean it all the way down, the latch comes out. Latched with the hood, it stays in place well, but I’ve always been concerned that it’ll come out of the base. Here I’ve started work on attempting to fix it.

Here’s the base showing how it’s slowly worn open. This image is actually after I realized I could just fix it (see the next two images for the other option I tried). I used the hammer to carefully hit the sides of the opening to close them up better. It worked, and seems to have repaired it for now.
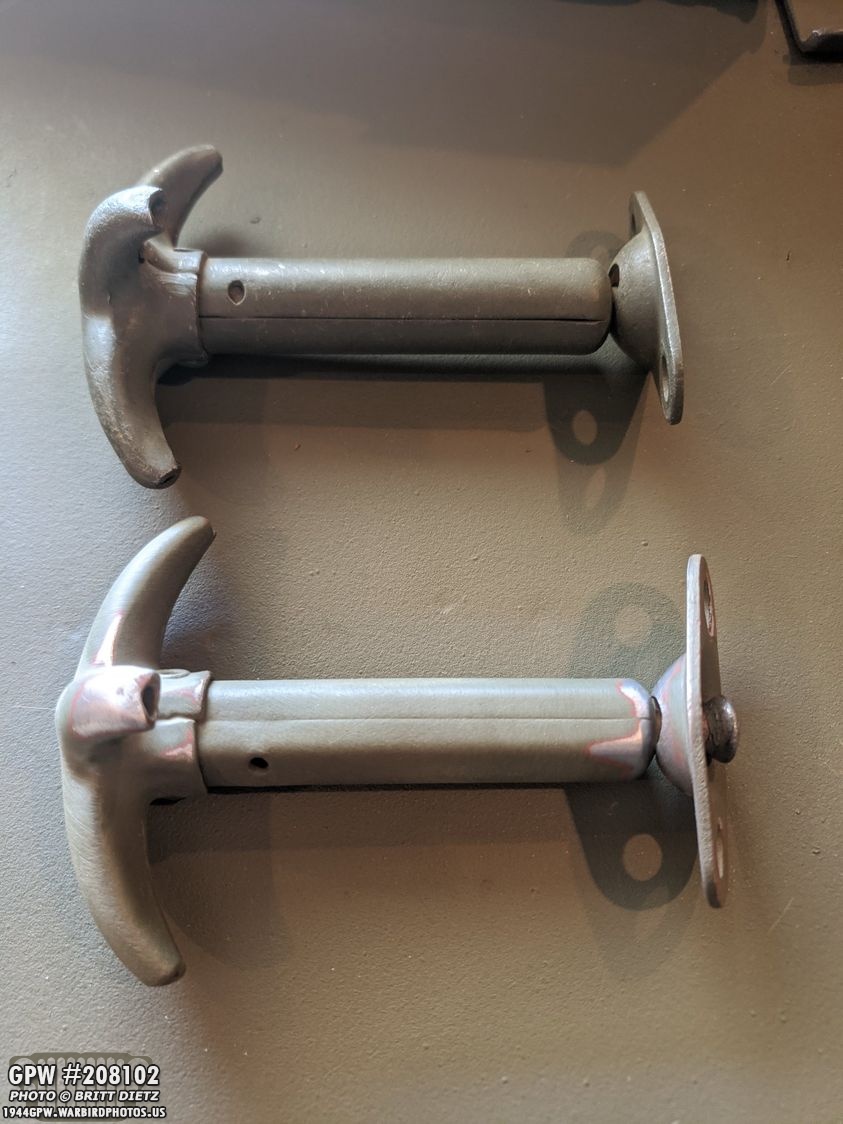
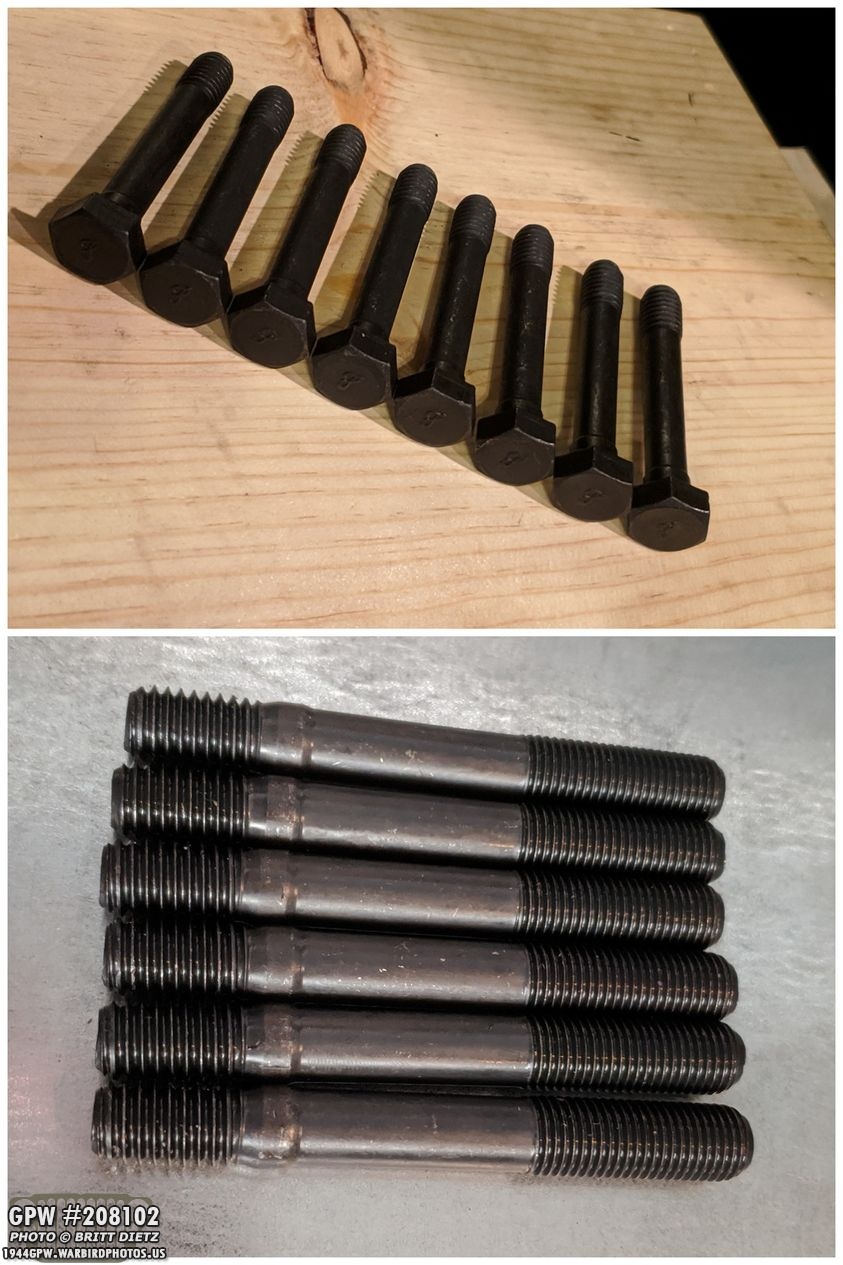
But before I did that, I was going to just replace it with another take-off latch which I got from Ron Fitzpatrick Jeep Parts on eBay. The top one is the new take-off one I got while the bottom is my original. But, there was an issue…
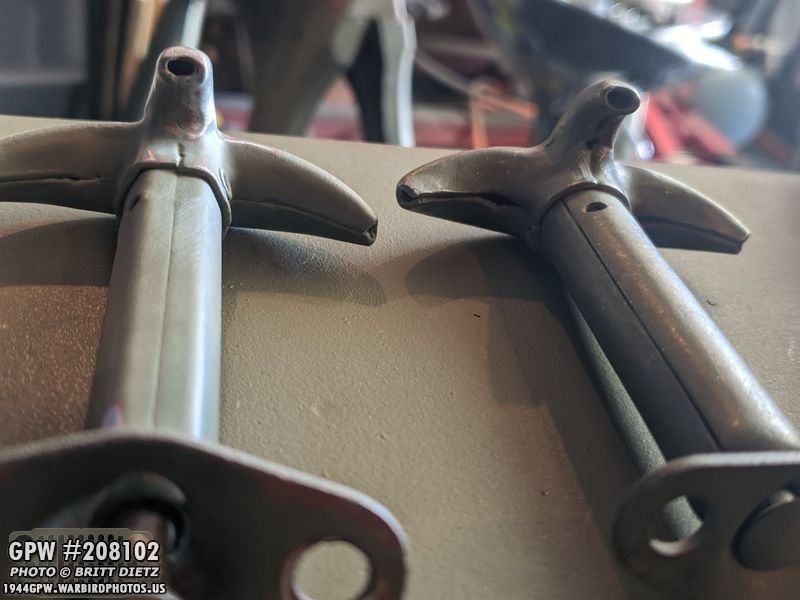
A little lesson on wartime hood catches. The main body is shaped like a D with a flat side facing the hood. You can see that on my original to the left. I thought (my fault) the one I got from RFJP had a flat side but it turns out it’s a post-war catch. Ah well, it’ll be good to have this just in case of an emergency I need a spare. So that got me going back to my original and repairing it as best as I could. It could still eventually wear itself back out, but it should hold for a while now. I’ll repaint it and install it this weekend.
Speaking of mail call items, here’s a little preview of some items I got from an upcoming really big project for the Jeep! I’m not going to say what it’s for yet (those of you who know what these are might have an idea), but I hope to get started next week for the Jeep’s birthday!

I also got another shipment from Ron Fitzpatrick Jeep Parts, this time featuring several items for this upcoming surprise project, another spray can of 33070 OD Green paint, and a special F stamped item…

I saw someone’s recent post about their throttle linkage clip having an F stamp on it. Mine didn’t, and I think was replaced at some point. It was a little worn, but still worked well. So I picked up an F stamped one to replace it! To the left is the unpainted clip as I got it, then after sanding it, I hit it with Ford Engine Gray paint.

Here’s a look at the new F stamped one (top) and the old one that was on my Jeep (bottom). You can see, the right side hole where the spring connects is slightly elongated from wear.
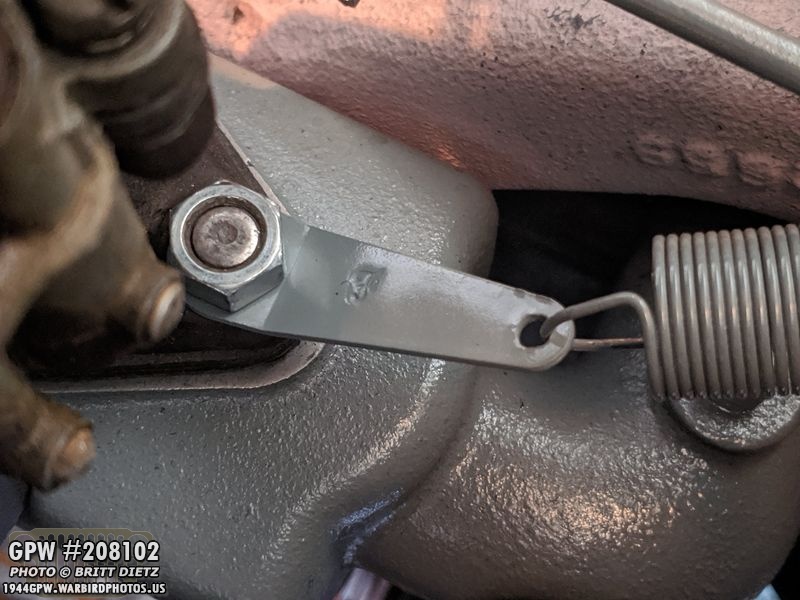
Now here it is all installed on the carburetor! It’s a small change, but another step closer to For correctness!
Before we dive into the biggest project of this week, here’s an update on the last two week’s flush of the coolant system. I’ve driven the Jeep a few times now, and so far it’s been successful. No issues with any leaks that I can see from the radiator or the block and the radiator cap still looks nice and clean!

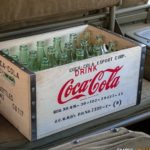
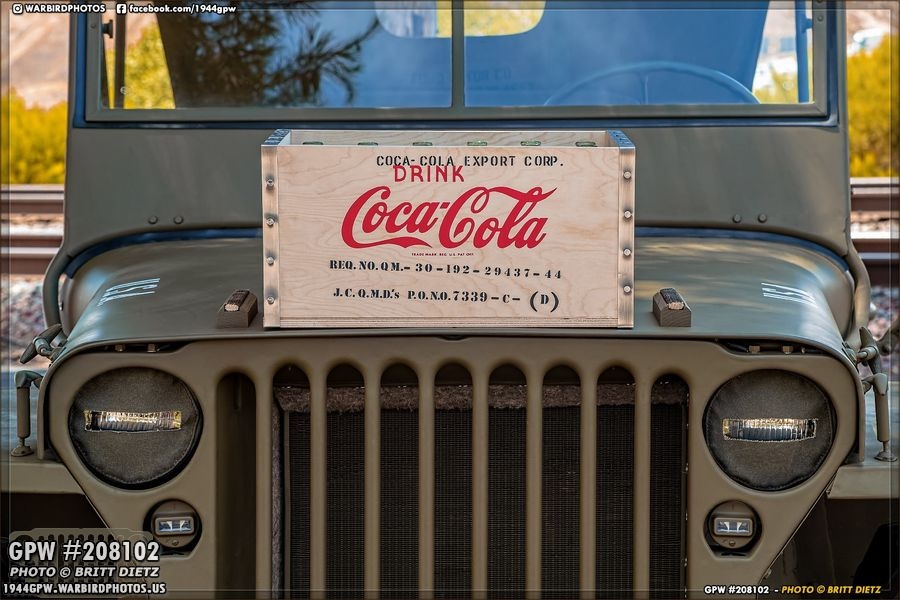
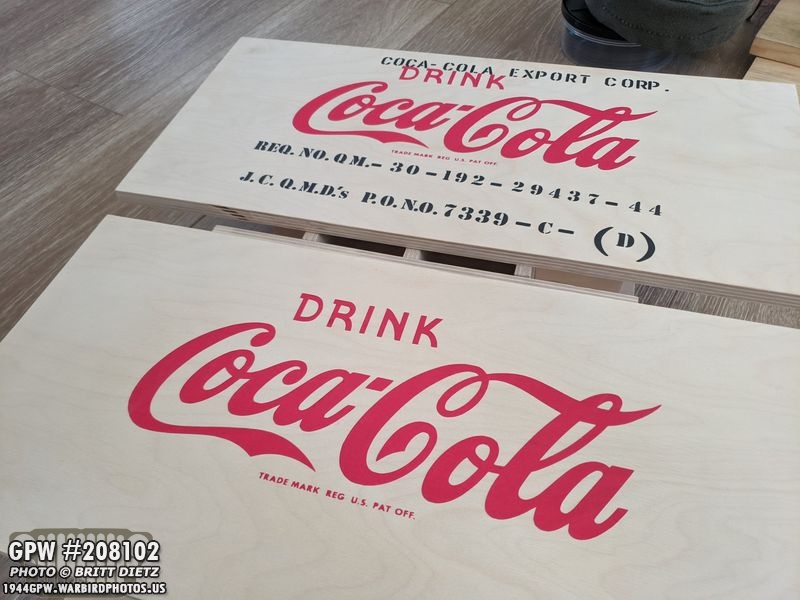
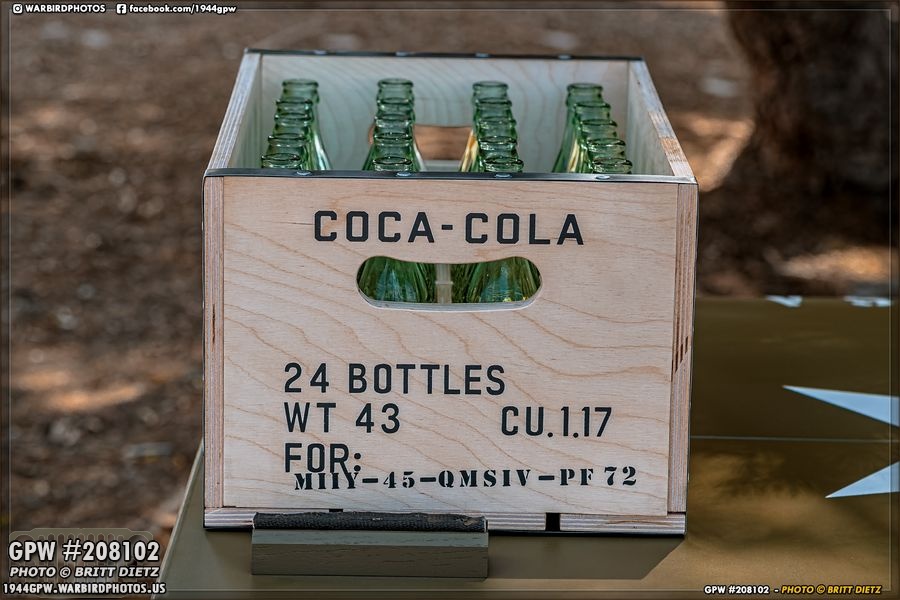
Now on to the big project… building a Coca Cola crate from scratch and making it photo accurate! I’ve wanted a wartime Coca Cola crate for a while now, being someone who collects WW2 Coca Cola items. I’ve seen several Jeeps with these crates in them, and while you can purchase replicas online, they all have incorrect issues. I’ve only seen TWO photos of these crates, and of the two this one shows the most detail so I decided to try and replicate these down to the correct Coca Cola logo, correct fonts, and researching the markings on them.

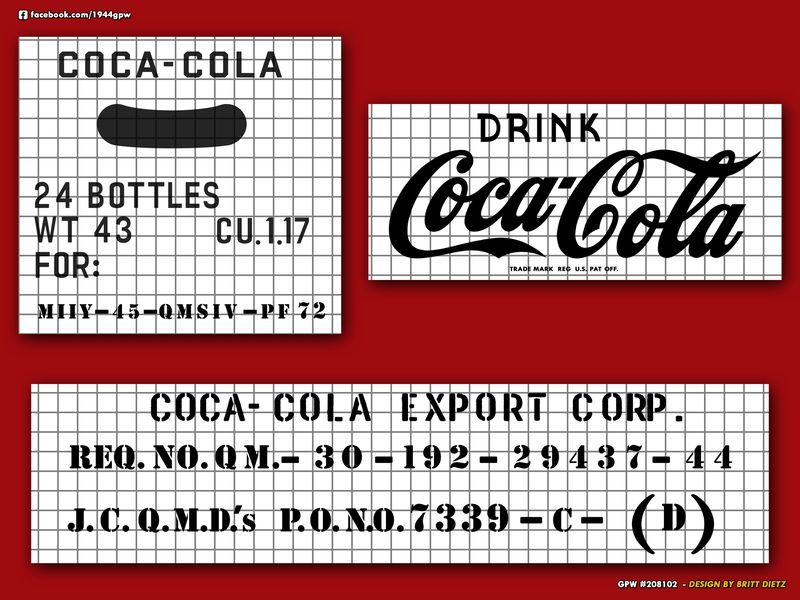
Using Photoshop and my Coca Cola research, I recreated the crate in photoshop at full size. This helped me figure out the sizes for everything I would need. From there I was able to make dimensions for the entire crate and all the stenciling.
I was then able to transfer the stamping from photoshop that I created over to my Cricut machine to make stencils for painting on the wood.

I originally wanted to get solid pine, but I found that to be incredibly difficult in the 1/2 and 3/8 widths needed. I don’t have the tools to take 3/4 size and lathe that to the sizes I needed, so I had to substitute plywood instead. That was the main difference I had to change. Here’s photos from last week’s update where I started the work cutting the wood for the dividers.
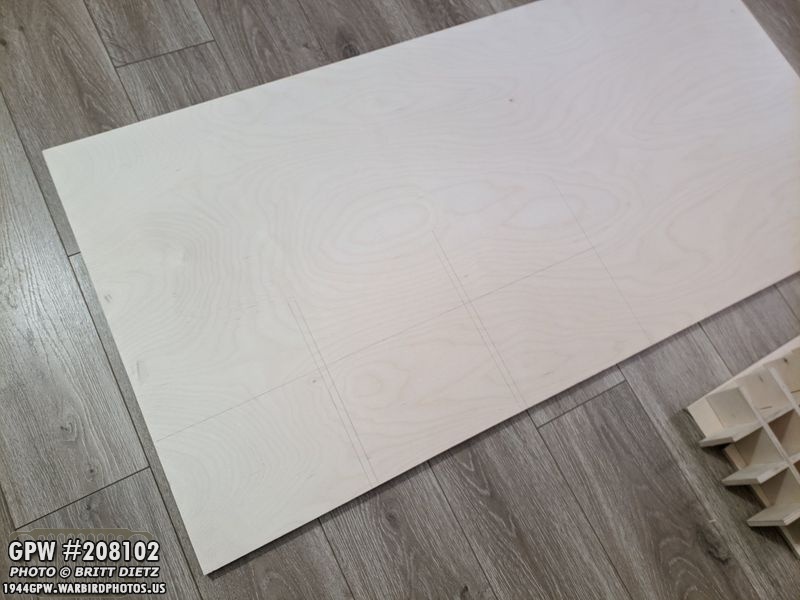
I then measured out the side walls and the handle walls (shown here).

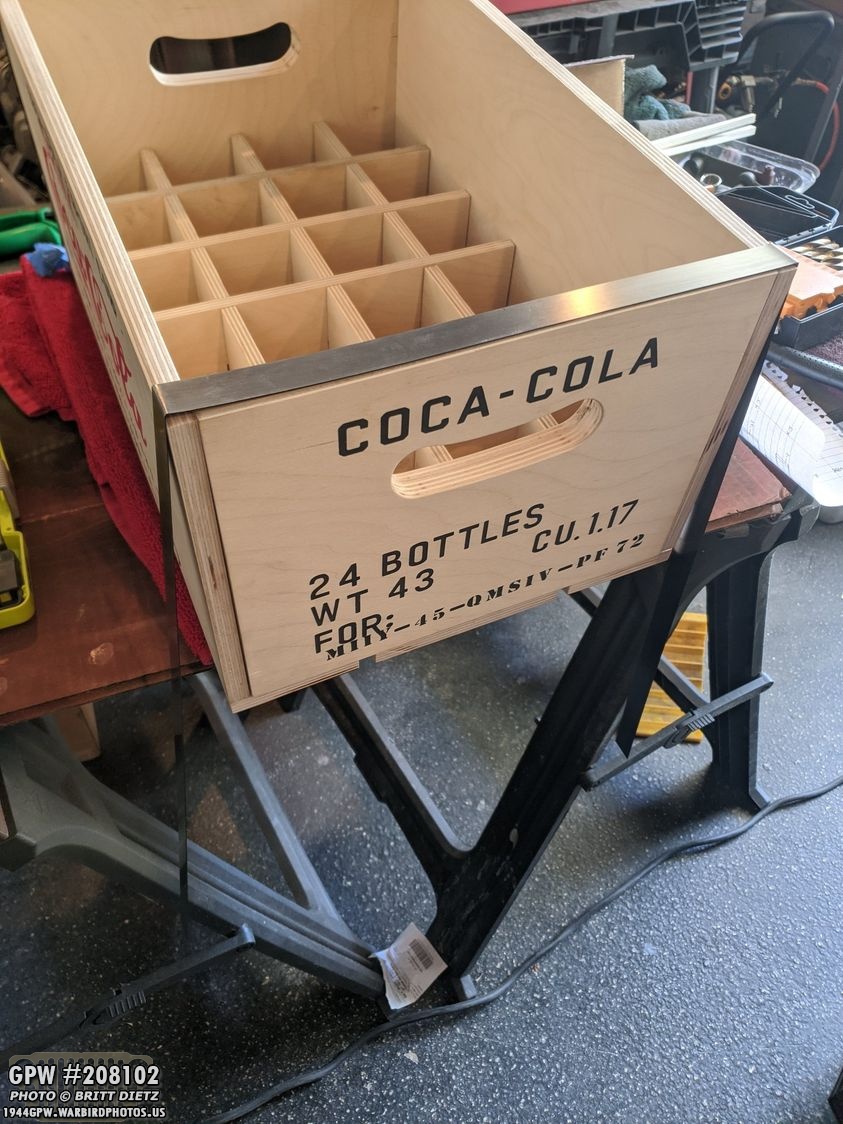
After cutting everything, I carefully placed it all together to see how it’ll look. Taking shape for sure! Now that it all lines up, it’s time to add the stencils!
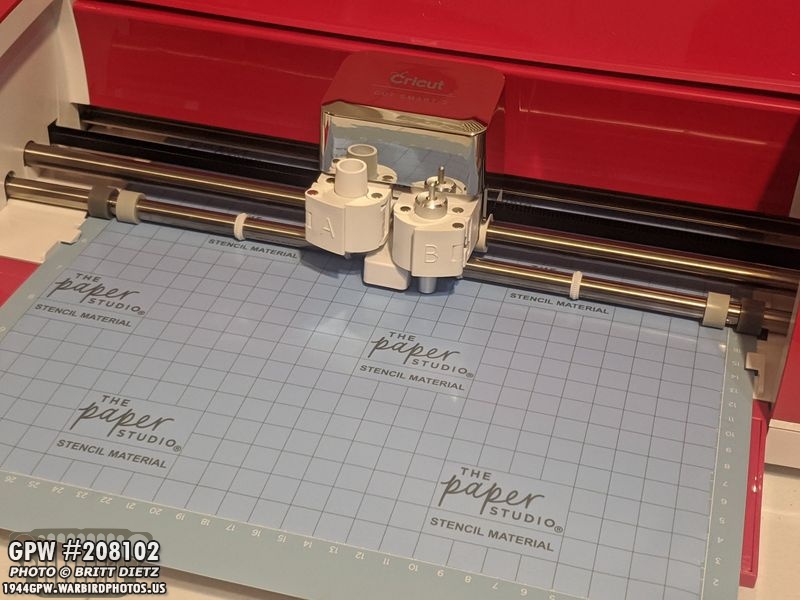
Here’s the Cricut Explore Air 2 machine cutting the first stencil for the crate with two Coca Cola logos.

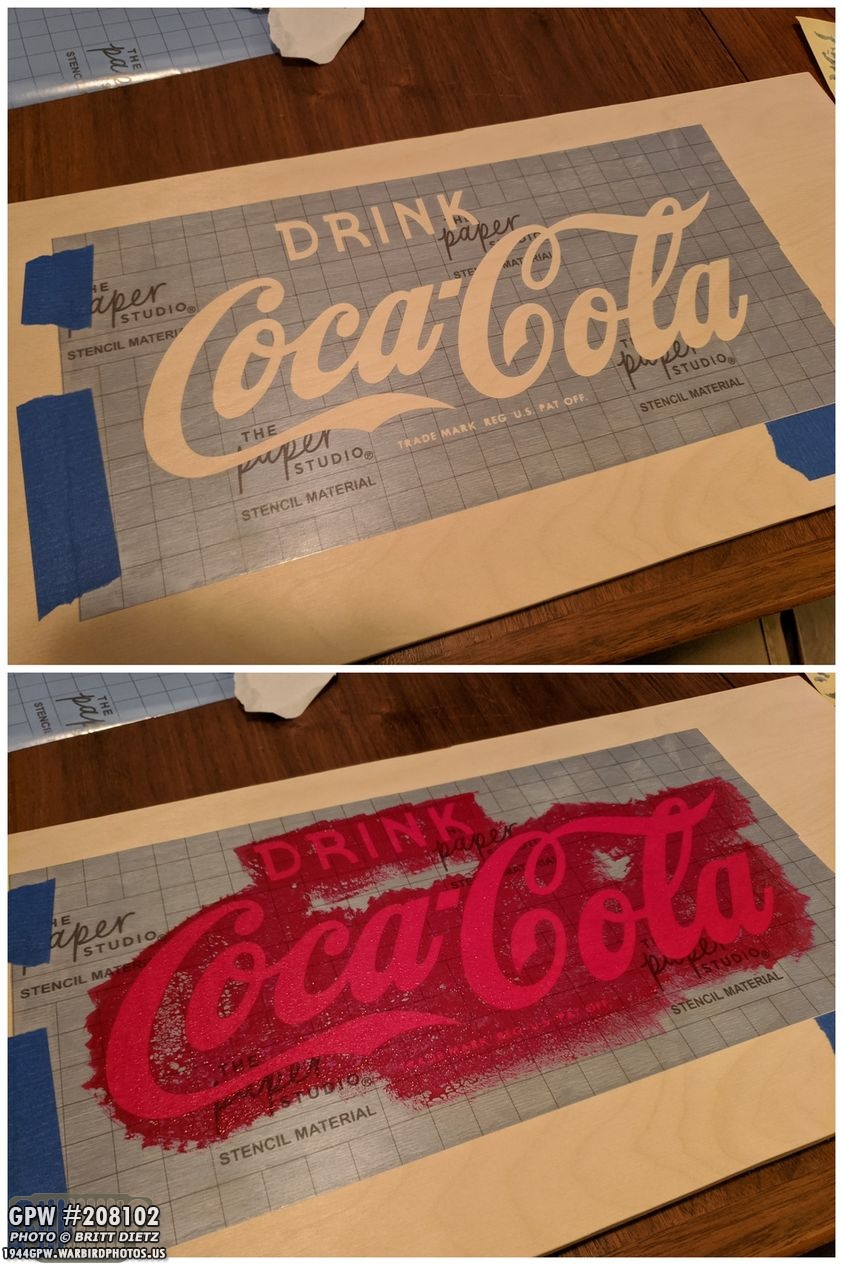
Three steps to adding the stencil. First, is the stencil with the inner parts of the letters (called negative shapes) removed. The second photo I’ve added the stencil to the wood. There’s a transfer tape layer over the stencil to keep all the inner letter parts (like the D R, O, A, etc) together with the stencil. Then the last photo is after I’ve removed the transfer tape and it’s ready for paint.

I used a small foam brush to stamp the red acrylic paint on the long side walls. This is better than spray painting as the spray paint often will bleed under the stencil. Using the foam brush allowed me to put the paint on straight down also avoiding any bleeding. On the bottom is the result nice crisp edges on the letters!
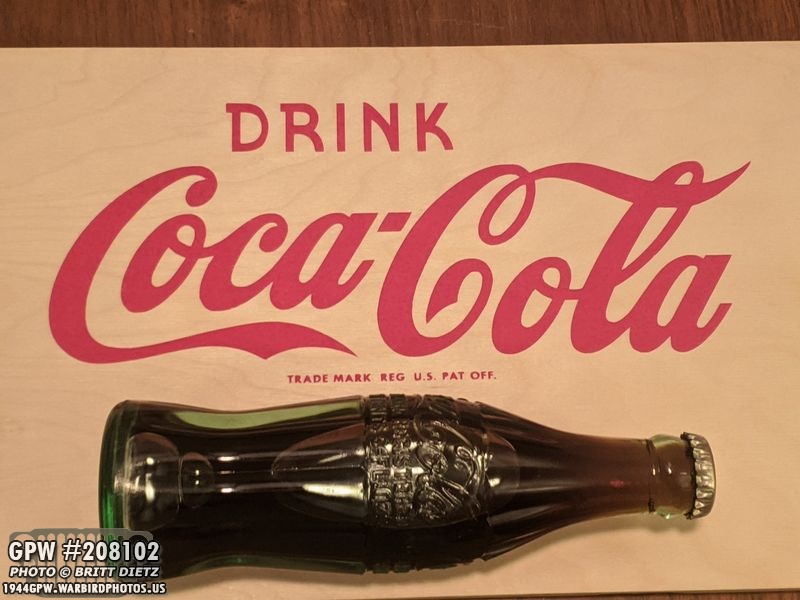
Here’s a 1945 Coca Cola for scale. I’m amazed at how small lettering the Cricut machine can cut for stencils. The Trade Mark lettering is really small, but still came out crisp!

After 24 hours drying, it was time to paint the black stamping with the ‘COCA-COLA EXPORT CORP.’ next. I was a bit afraid of putting the stencil over the red lettering as I worried it would peel it up when pulling the stencil off, but it did GREAT! Here’s the before and after!

I then moved to the first of two lines of stamping on the bottom. This line is the Requisition Number for the Quartermaster (REQ NO QM). I decided to make these two lines crooked to give it a more ‘stamped’ look.

After that was dried, I moved on to the second line, which is Jersey City Quartermaster Depot’s Post Office number, basically where it was shipped out of the US for overseas. This was the last stencil for this side wall, it’s the first finished piece!
For the opposite side wall on the other side, it has the same Coca Cola red stamping, but the black stamping is not repeated (remember, this is going off that original wartime photo).

Here’s how it looks peeling up the stencil. The stencils can only be used once, they often rip as I’m taking them off, as you can see here in that area between the C and L in Cola.

And here’s how the stencil looks with the main stencil removed. As you can see, the inner parts of some of the letters are still there. I will wait until the piece is totally dry before taking my little weeder tool and lifting those out.
Here’s both the side walls all done! I think the crooked bottom lines of stamping make it look a little less than perfect, and in the wartime photo, you can see most of that stamping isn’t straight. There’s been some debate on if the Coca Cola part was actually red in color…

Looking at the original wartime photo (top) you can clearly see there’s a difference in how dark the stamping is compared to the Coca Cola stamping. In the bottom photo, that’s my stamping and you can see the same variance between the darker stamping and the slightly lighter Coca Cola stamping. So that tells me (along with most crates stamped with Red writing on civilian Coca Cola crates during the 1940s) that it was indeed red.
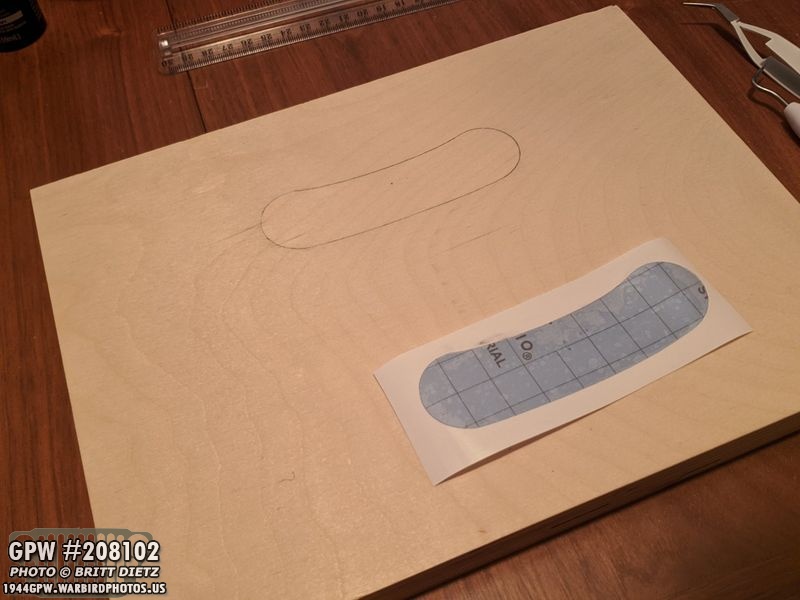
Now for the handhold walls! I did some tests last week, so now, armed with the correct sized plywood, I used the stencil for the handhold hole to draw the shape and then took my jigsaw out and carefully cut the shape. I got much skinnier jigsaw scroll blades, which helped make better curves.

I then took the rest of the stencil and, like the other stencils, removed the ‘negative shapes’ from the stencil. This is a pretty tedious process.
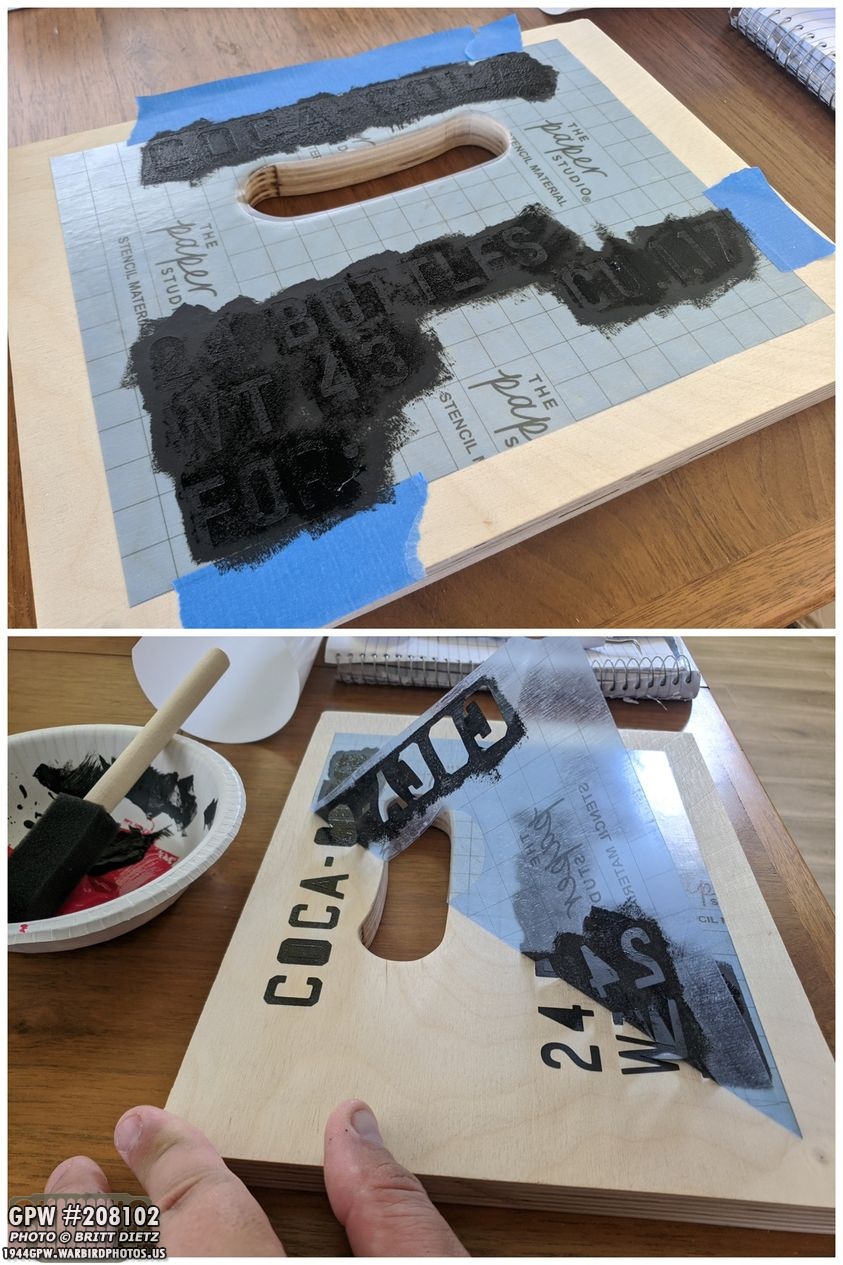
I didn’t get a photo of the handhold hole being cut, but here’s the first wall getting the stencils done and you can see the freshly cut, sanded, and smoothed handhold hole. I used the same stamping method with a foam brush to put the black on. Then I peeled it up.
Again, I waited for the paint to dry before taking out the inner letter shapes.

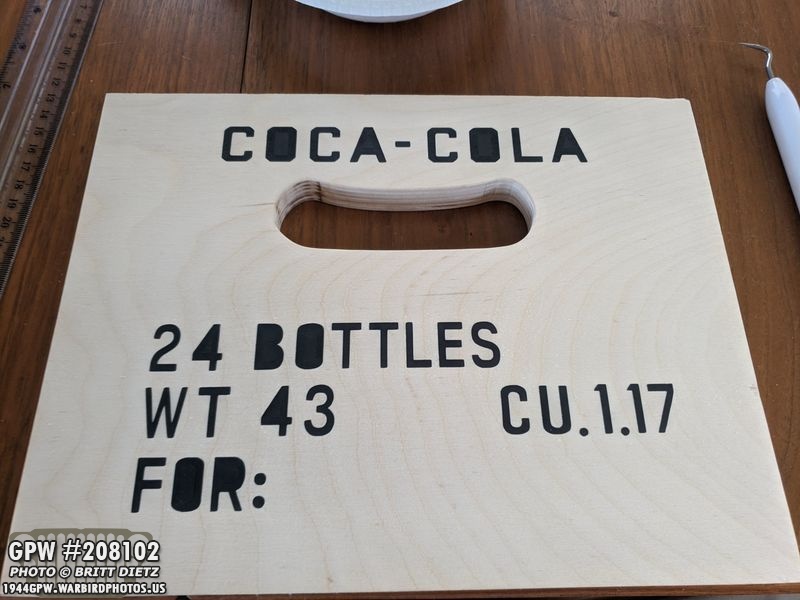
After removing the inner letter parts, it was time for the stamping (this is only one one side like the other black stamping) that has the encoded destination information. I mentioned this last week, but here’s the encoding as best as I could research online…MIIY – Four letter coded destination45 – Two digit arrival time, possibly April (4) of 1945 (5)?QMSIV – Quartermaster Service # IVPF72 – Two letter/Two Digit information from the receiver/commander of who it’s supposed to go to specifically.I also made this line tilted to make it look stamped.

Time to put it all together! That involves adding metal banding on the edges, but I knew that would be hard to do without some help. So I though about using hot glue to hold it all together as I added the metal banding straps. That didn’t work, the glue cooled and dried instantly hitting the wood. Very odd. So plan B was using Gorilla Glue… which worked!
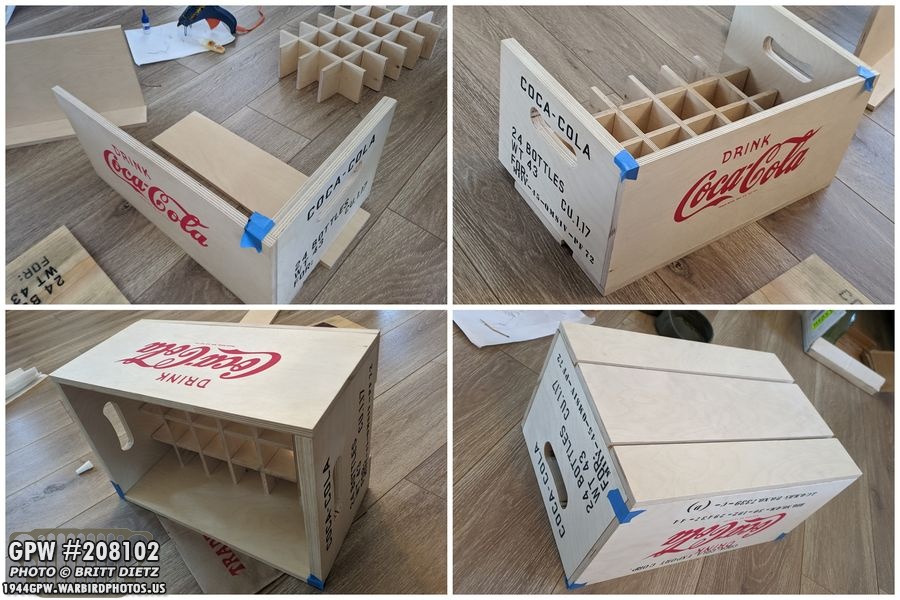
The Gorilla Glue dried pretty quick, about 45 seconds after holding it tightly together, the pieces glued together. I used painters tape to help keep them tight. Slowly, the crate started to take shape! I used the wartime photo to make sure I put the panels on the correct sides.

The last stencil to go on was for the large cover! Same as the rest of the stencils, I used transfer tape to keep the inner shapes together with the stencil, peeled that off and had a perfect stencil that I then painted red!

Now it was time for the metal banding. This proved to be VERY difficult to find. Most places only sell this banding either 1) as ‘plumpers tape’ that has many holes in it, or 2) in massive sized rolls for $150-$300. I didn’t want to spend that much for something I only needed about 6 feet of. I lucked out and found someone selling a partially used roll (300 feet! yikes) for $30 in the correct 3/4 size. It arrived painted black, but after some sanding, I was able to get it back to metal. I then tested it on a scrap piece of wood with some smaller nails, and it worked well!
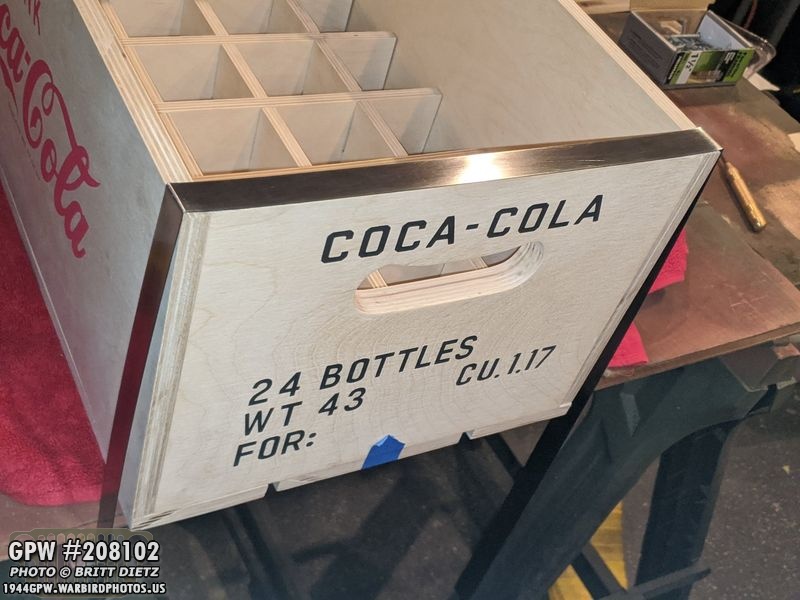
So I took the glued crate and started by cutting a 3 foot piece of the banding, sanding the paint off, and then making the corner bends for the top. It helps to make all four of the corner bends BEFORE you start to nail it in place. I used a thin piece of metal to help make the bends, then used a hammer to make them sharp bends.
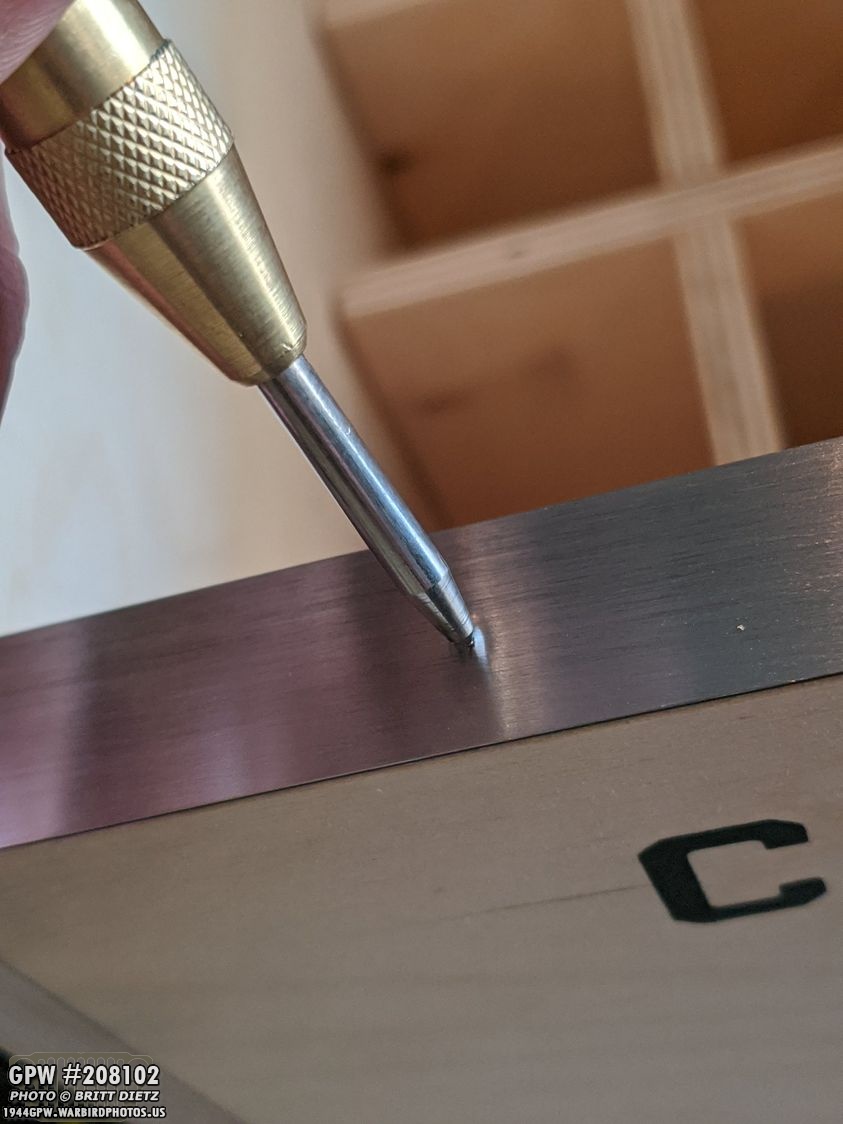
Once all four corners were bent, I then used a spring-loaded punch to make the marks for drilling. Since I was using plywood, I thought that by drilling pilot holes for the nails, it would help the plywood from splitting along the layers.

Each punch was equally spaced with 4 on each side, just like the original wartime photo. I then used the drill to drill through about an inch. I was then able to hammer the nail in. I went out and chose larger sized head nails to match the wartime photo as well. I only hammered them in until they made contact with all the layers it needed to go through to hold together, and moved on. I’d hammer them the rest of the way in at the very end.

On the bottom, I overlapped the banding so each end is held by double nails in the center. I also cut the banding close to the nail so there wasn’t a sharp edge that could pull out.
After hammering all the nails in all the way, this side was done! Sadly, because of the hammering, it caused the glue to fail on the other side, and it came apart. But, since this side was done, it still mostly held together. I used a towel to keep it all from scratching up while hammering.
The other side started the same way with a 3 foot piece of banding that I sanded and bent in the top two corners. I then marked the bottom corners and bent them as well.

Because this side had fallen apart because of the glue failing, I only put two nails on each side to keep it in place. I could then go back and do the center two nails on all sides.

I did the same thing with overlapping the band on the bottom. Here I’ve got one of the four nails in. After this, I went back and put all the rest of the nails in and hammered them all the way down…

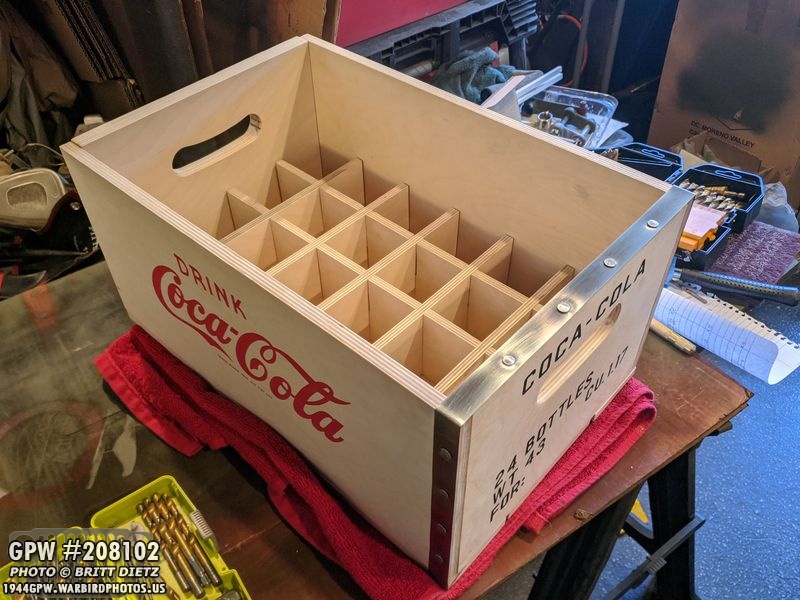
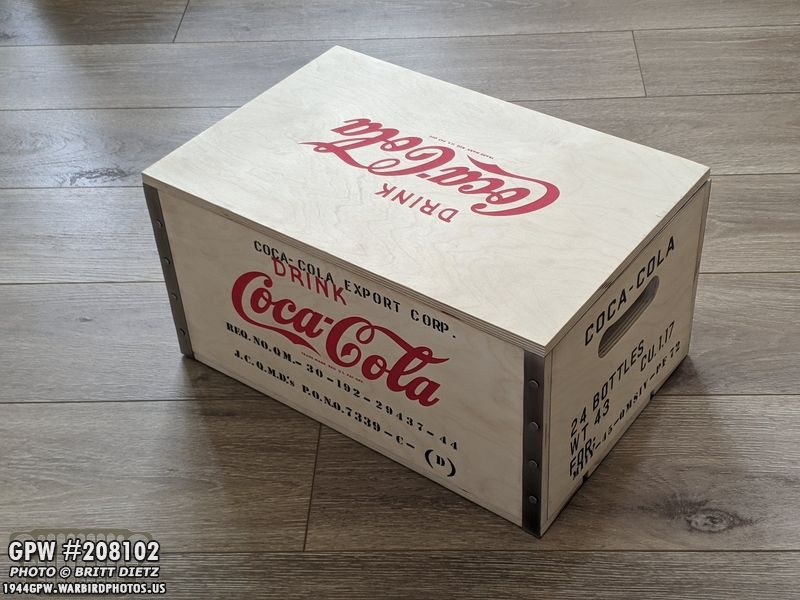
And then it was finished!! Here’s the first look at the completed crate! I put in 24 civilian coke bottles to fill it out!

Another angle of the crate. Sure looks great with all the bottles in there! Amazing it went from an idea to a completed crate in about a week and a half!

The inside dividers are perfectly spaced and each coke fits nicely in each spot with only a sliver of wiggle room. They are secured from really moving around. Maybe one day I’ll do another one with solid wood, if I can find the widths I need, instead plywood.
And here’s a look at the crate with the loose lid on it. The lids were not nailed down from what I could see, they were loose with twine or straps holding it on. There’s no evidence that the cover had the Coca Cola stamping on it, but considering they had stamping on all sides, I can’t imagine they didn’t have this.
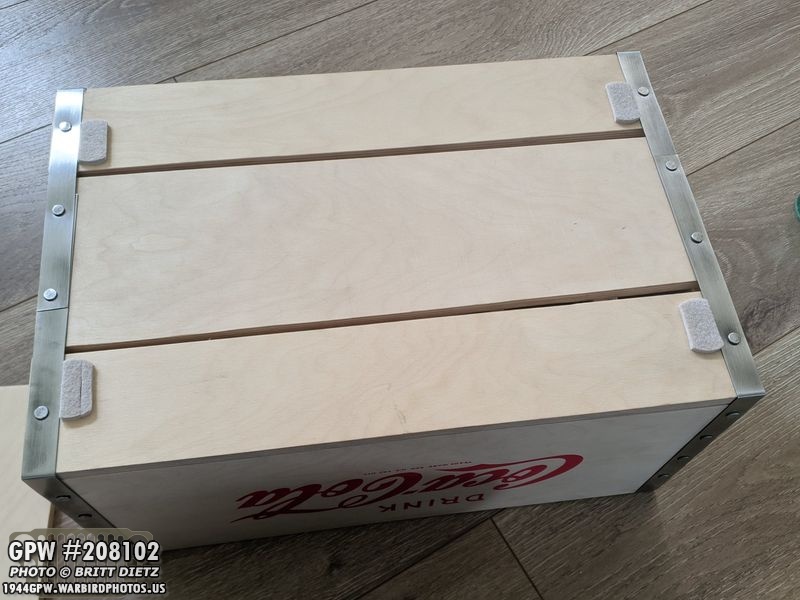
Here’s a look at the bottom with the correct 3-panel bottom. I added some thin cut-down furniture felt pads so the nail heads won’t scrape up the Jeep. With that done, it was time to take the Jeep and the crate out for a photoshoot!
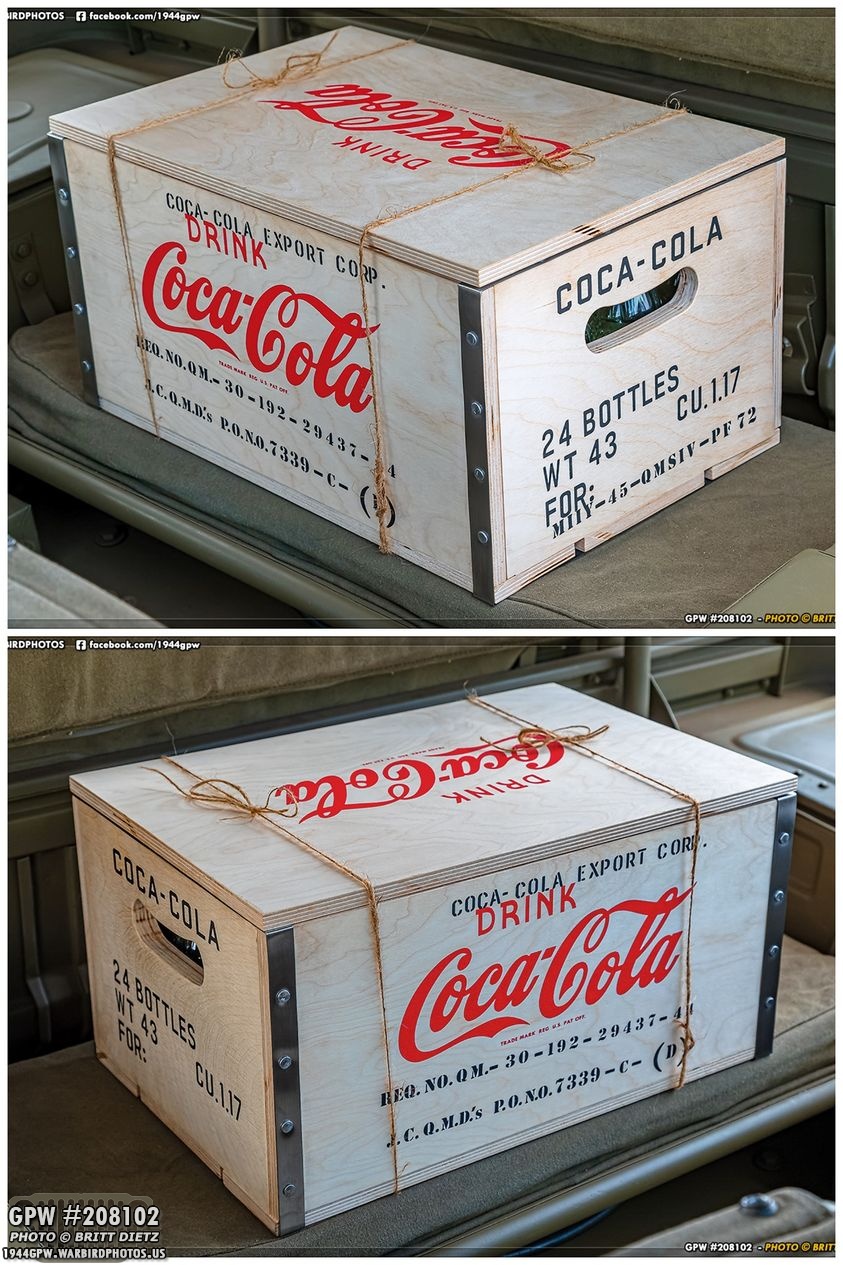
I used some brown twine to tie the lid on the crate. Looks pretty awesome! Aside from the plywood instead of solid wood, I think this is the most accurate Coca Cola crate in existence.

Here’s a look with the lid off.

Now I need filled Cokes in there! (more on this in a few photos)

And another look inside the Jeep. I’m not sure where I’m going to put it in the Jeep when on display, but I’ll figure it out.

Here’s the crate on the hood from various angles. I think it’s as accurate as I could possibly get it!
I’m thinking about spraying the entire thing (minus the metal bands) with a clear protector overspray… but then again, I don’t mind if it gets a bit beat up as that’s how they’d look after shipping.

Some detail shots. Okay, enough with the photos of the crate, now to talk about why there should be clear cokes in the crate!

Technically, the crate should be filled with clear cokes, as you see on the left. What’s a clear coke? That’s a wartime coke made for the servicemen where there bottling was overseas and the green tint in short supply. It has no city stamped at the bottom that says where it’s been bottled like the civilian made cokes. The right two cokes are wartime civilian Cokes (one filled, one not). The clear cokes are a bit harder to find, and I only have two so far. The clear one you see here was found on Utah Beach and is from 1944. The question is, however, that these crates have stateside stamping on them, so that begs the question if they were clear or green colored cokes since they came from stateside.

How do you tell a Coke is a wartime coke? The easiest way to tell if the Coke is from the late 1930s to 1950 is the D-105529 patent number under the Coke logo (center image). If you look near the base, you’ll see a stamping with two digits on the ride side. The civilian coke (left image) has 45, so 1945. The right clear coke from Utah Beach has 44, so 1944. So I’ll try and collect 24 clear bottles but it’ll be a slow process.

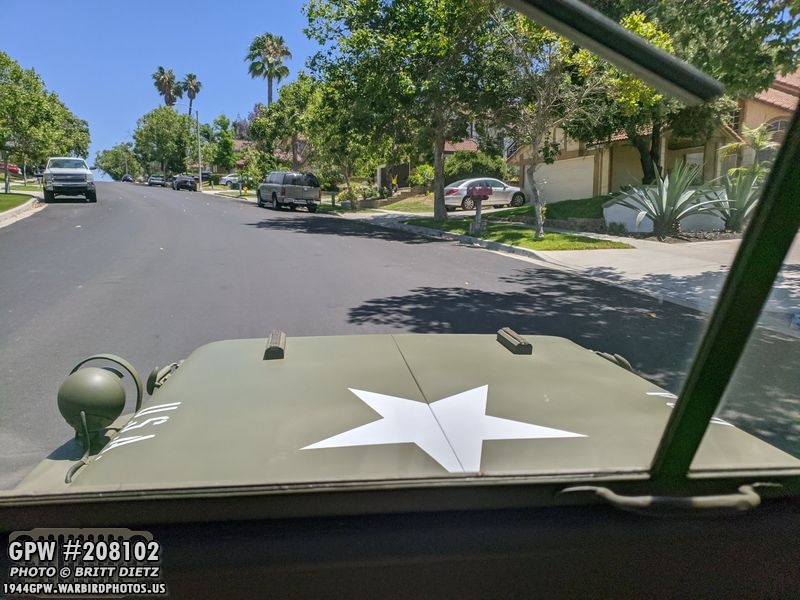
The next few shots are from the photoshoot with the Jeep from Wednesday. Looks so nice with the blackout headlight covers!

With the headlights on, it sure does make the Jeep look like a mean green machine!
And here’s a look at the Jeep with the much better-looking canvas water bucket on the jerry can in the back. You can also see the Ford F stamped cover for the mirror.

I’m really liking the F stamped mirror cover from Beachwood Canvas Works!

And that’s it for this week! As you may have noticed, I ‘end’ my updates lately with the ‘end’ of the Jeep. 😀 Next week I have several small projects in the works and hopefully a big one for the Jeep’s 76th birthday! Till then… see you next week!