 The week nothing happened…
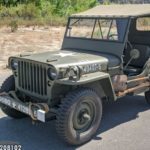
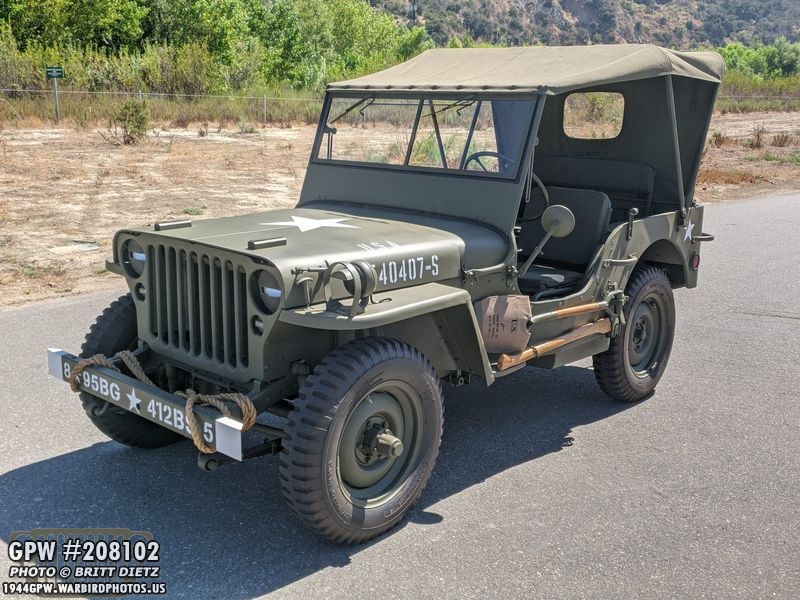
This week’s update is going to be a bit small, mostly because I had nothing I could do this week to the Jeep but drive it! With the axles on hold till I get a Ring and Pinion, tires and combat rims on order awaiting arrival, and most small projects done, this week I decided to do another ‘state of the Jeep’ and showcase what’s left to do.
It’s been a slow week, and kind of a sad week as I start to realize I’m seeing the end of the tunnel looming in the distance as far as her restoration. While there’s still several things I need to do, I’m closer to the end rather than the beginning at this point. She’s looking good, and running well.

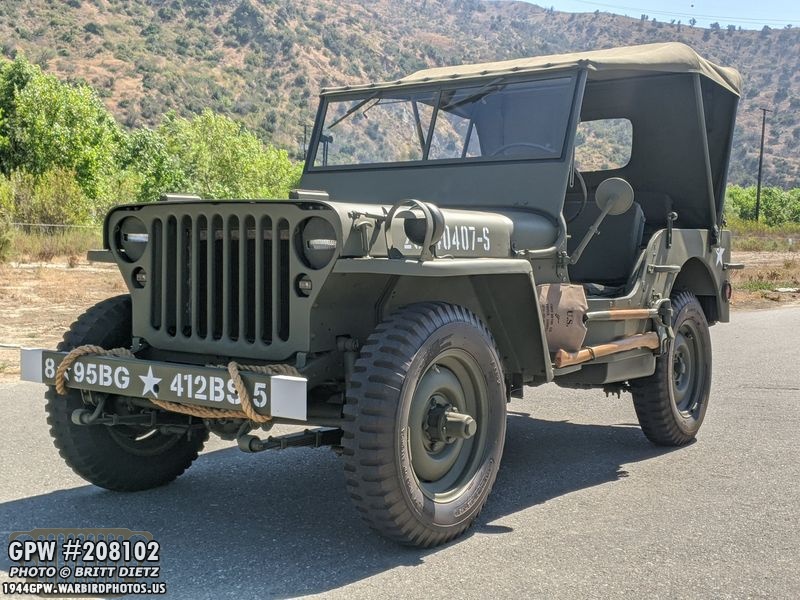
As I took the Jeep out to the local golf course to get some photos and figure out what I was going to post this week, I realized that I haven’t done a ‘state of the Jeep ‘ post in a long time. Seeing as I do actually have some projects left to do (some long term, some completed next week), I figured I’d make some charts of what’s left. This is a fun 90 degree panorama as I sat in the Jeep.

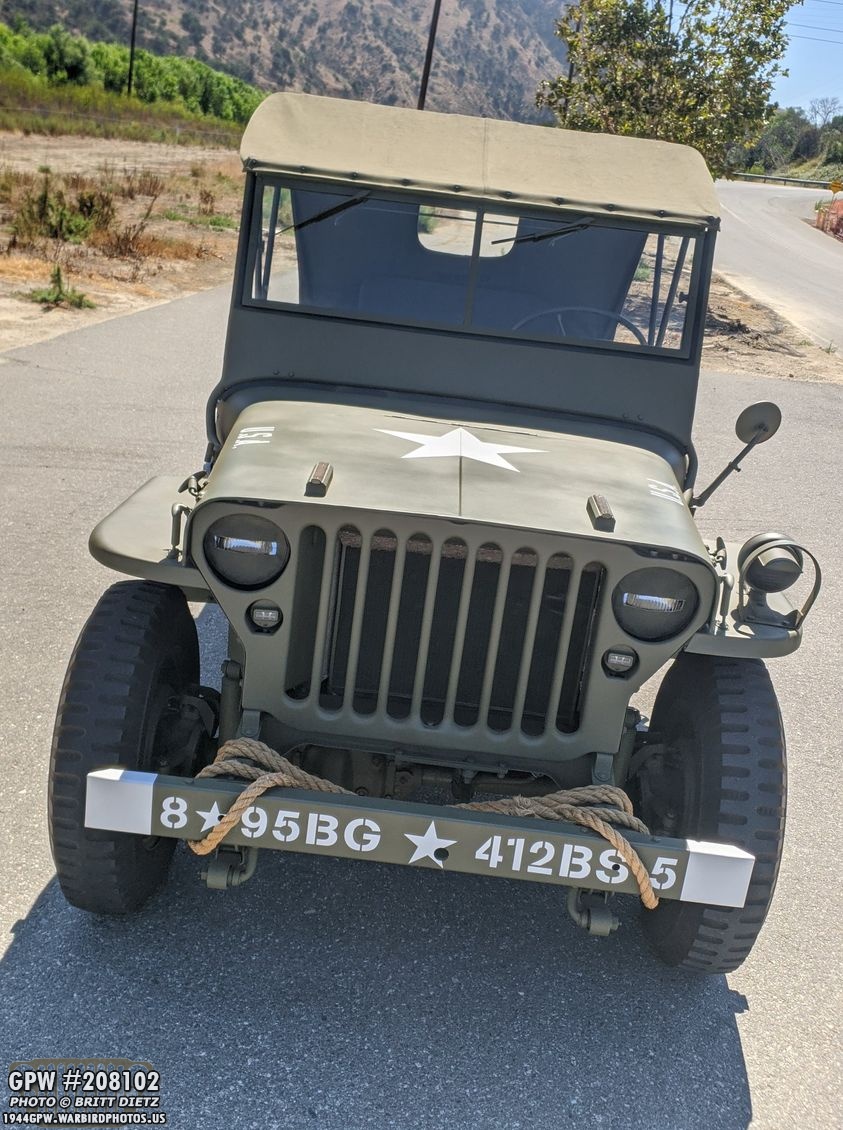
Let’s start off with the front. • I need to add a pinup and the Jeep’s name to the windshield under the passenger window. I’m hoping to have a George Petty pinup and a ‘yet to be determined’ name. • The axles on my Jeep are CJ2 axles. This is how I got the Jeep. I have a set of 1943 GPW axles I’ve been restoring slowly since Christmas of last year that I’ll eventually replace the CJ ones with. I’m getting closer to having these ready, but they are still a month or two off from install. • Because of the CJ2 axles, there’s a CJ2 steering system. The CJ bell crank was actually attached via a bracket on the front cross-member. So by replacing the axles with wartime GPW ones, I need to replace the steering drag link, bell crank, etc. I have acquired original GPW ones of those and they are restored and ready to go.

• Because my hood ended up sagging and having so much cancerous rust, I had to replace it with a repro hood. I hope to make this only as long as it takes to find an original GPW Hood to replace it. (anyone have a spare I can buy off you?). Once I get the new hood, I’ll put the correct factory number, 20540356 (which I found on my original hood after wet sanding a few updates ago) on.• As I put the new GPW axles on to replace the CJ ones, I plan on adding Firestone 600-16 NDT tires to match my spare tire (the other four are a ‘knock-off’ brand). I pick the new tires up along with the flaps and tubes later today (look for that update next week). • Along with the tires, I plan on replacing the civilian rims with Combat Rims. The CJ axles and Civi rims came on the Jeep when I bought it. • I hope to sand the shovel wood handle to get it a lighter look to match the axe a bit better. These are repro, but if I find good originals at flea markets, I’ve eventually replace both with wartime ones. • The biggest project that will take the longest time is the fixing of my original tub, which is sitting in the garage awaiting a LOT of welding work. It’s got a lot of very bad rust with large sections needing replacing. I’m just starting to weld (see later photo in this update), so it’s going to be a while till I feel ready enough to tackle the original tub. Right now, I have an MD Juan tub on so I can have fun with the Jeep until the original tub is ready, then I’ll swap them.
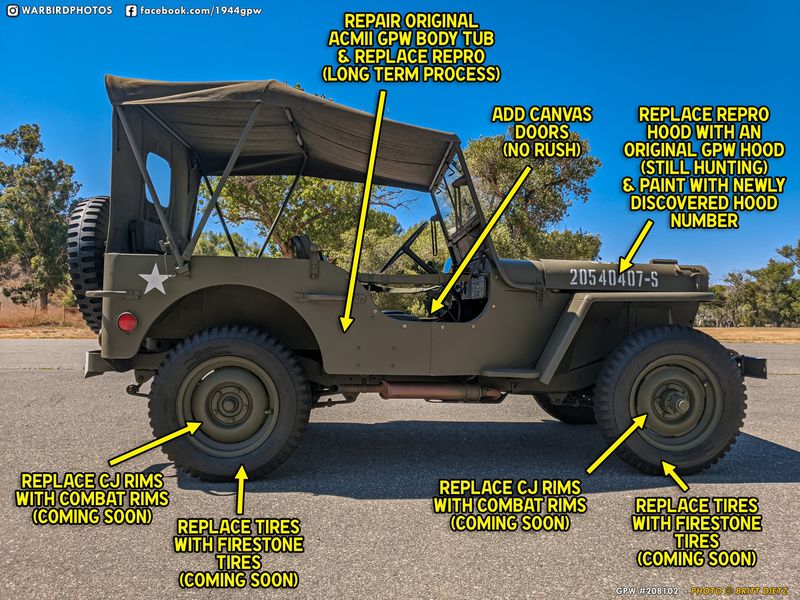
Pretty much all the same things as the previous image… • I will eventually add a pair of canvas doors. I’m in NO hurry, however, as I’ve heard it’s a pain getting in and out of the Jeep with them.
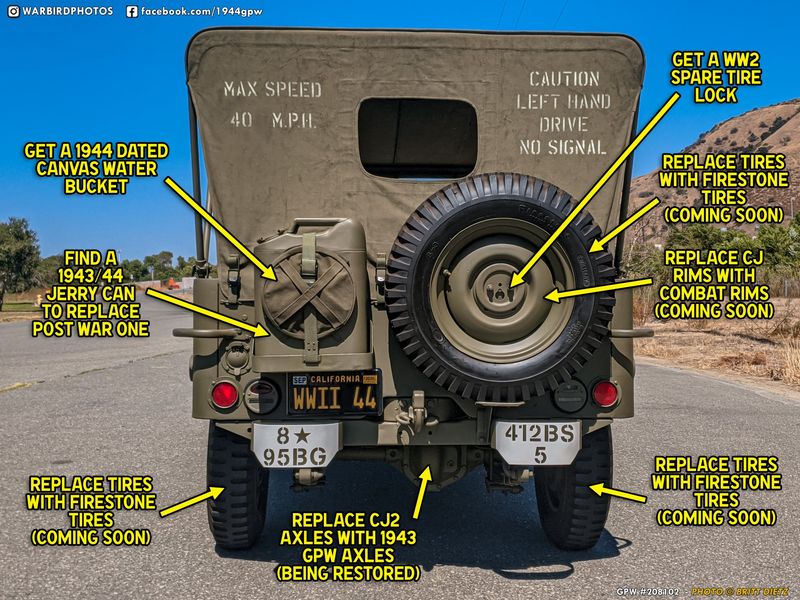
• My canvas water bucket has no markings, and after dying/spraying the OD Green back into it, it works great for now. If I find a 1944 water bucket, I might swap it out. But no rush, and only if I find one for cheap. • My jerry can right now is from the 1970s. I hope to replace it with a 1943 or 1944 dated one eventually. No rush, as the post war ones look exactly like the WW2 ones. I have an early 1941 jerry can, but I’m not sure I’ll use that on the Jeep (see later post).• I plan on getting a wartime spare tire lock, just as a safety. Right now you can just undo the lug nuts and take the spare wheel, so once combat rims are on it, I plan on locking it up. The spare tire lock is a wartime device that uses the H700 key like the ignition.• My rear tire already has a firestone tire, so it won’t be replaced. But I will take in the wheel to get the rim removed so I can add the new tube, flap, and a combat rim.• And of course, the rear axle, tires, and rims will be replaced.

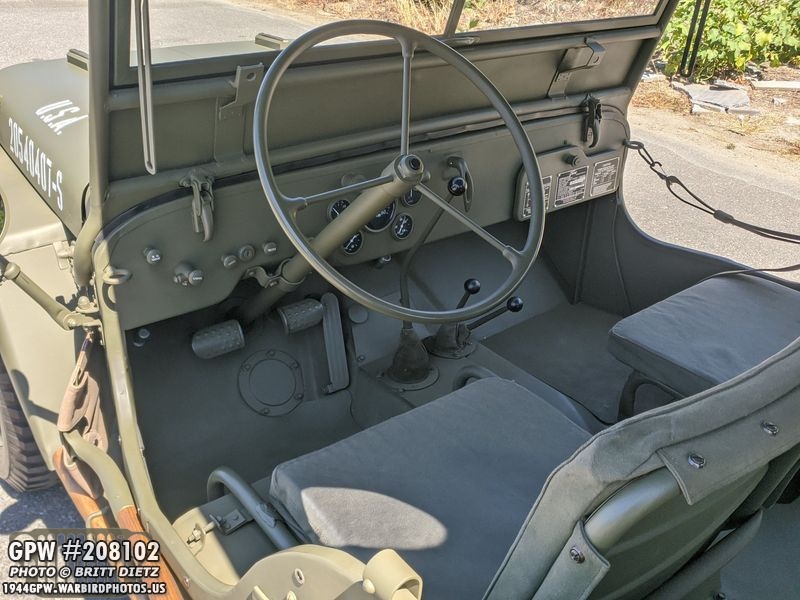
Looking inside the Jeep…• I’ll be adding a Fire Extinguisher bracket to the Jeep next week (look for it in next week’s update), and hopefully a SOS Fire Guard extinguisher to go with it both under the driver’s side dash next to the clutch.• I’ve debated on getting a rifle rack. Jeeps were shipped with them, but Army Air Force (AAF) Jeeps almost always are missing them as they got in the way. I’m debating if I really need one or not since my Jeep is AAF.• The windshield to cowl weatherseal has gotten warped a bit, and there’s a gap in the middle. I’d like to replace the whole thing as it just doesn’t sit right. No rush, but eventually. • I need to fix the passenger side seat (all seats are original). It has a hole in the back rest, and a large hole in the frame tube. Once I feel good about my welding skills, I’ll probably tackle that myself. For now, it looks just fine.• My original GPW T-84 transmission needs to be dropped, taken apart, and fully gone through. I regret not doing that when the tub was off during the restoration last year. I need to fix some things with the shifting that has been a little wonky.
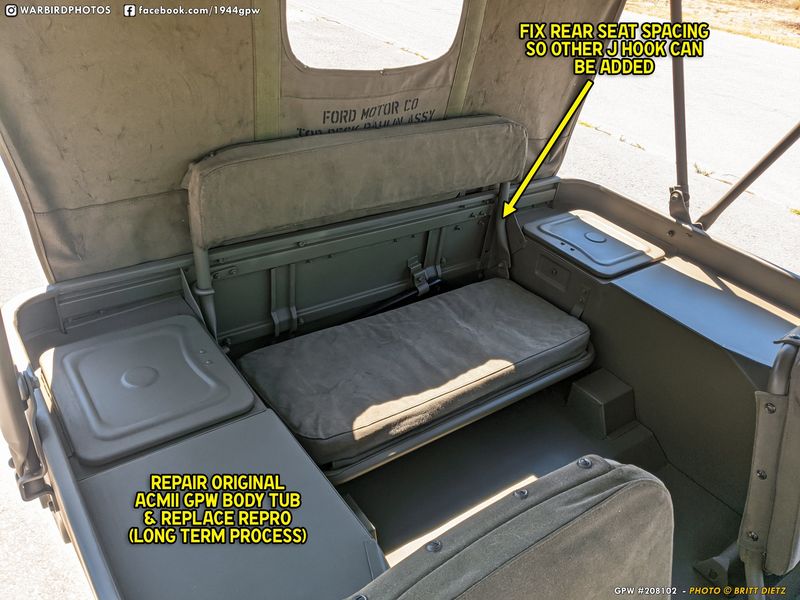
• As mentioned before, long term fix of the original body tub, then replace the repro with the original. • The rear seat has always had a spacing issue, so I can only fit one of the J hooks on that hold the top up (see the passenger side, or left of the image). I’m not sure how to do this exactly, so I just need to take some time and play around with the seat, or (which I think might be the case), make a custom J hook to fit.
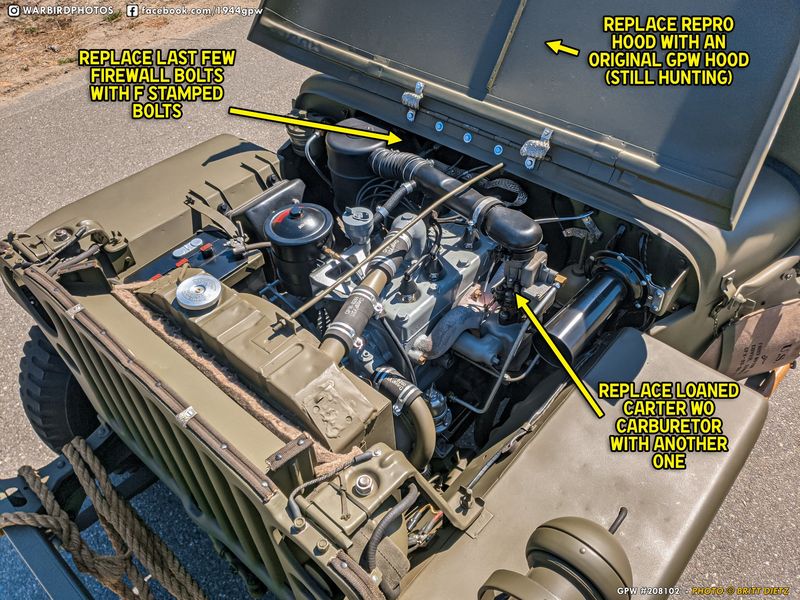
• As mentioned, replace the repro hood with an original GPW hood once I’m able to find one. (Sure you don’t know someone with a GPW hood for sale?)• I have a few bolts in the engine bay that still need to be changed to F bolts, like the air cleaner bracket bolts, the oil filter bracket bolts, battery splash shield bolts, etc. • I’m using a borrowed carb since my late/post-war carb doesn’t work, even after a full tear down and cleaning. So I hope to get a new carb so I can give this borrowed one back!

• I had to replace the fuel lines a few updates back when the steel (they were original wartime lines from what I could tell) started to bleed fuel in two spots. I replaced all the lines as a precaution, but I haven’t replaced the mainline that goes from the firewall mounted fuel filter to the fuel tank. That one takes a bit of work to finagle in there. That line has a very very slow weep, but it’s not enough concern to replace it asap. • I need to add the voltage regulator inspector’s stamp (which I’ve been experimenting with, see previous updates and later in this one). I hope to do that soon.• My voltage regulator is 6v, but my system is 12v. So it’s more there for decoration. The insides are pristine, but I’d like to trade them for 12v ones so I can actually hook it up. • My battery is a flat top modern group 24 battery from Walmart that I’ve removed all the top writing, painted black, and added some Willard Battery items to make it appear older. But there is a place that sells Willard replica batteries that are 12v. They are over $325, so I’m in no rush. • Same with the generator. I have a 12v alternator, which works great. But I’d love to put a 6v generator looking 12v alternator (yes, they do exist, also for over $350) in. But I’m, again, in no rush.
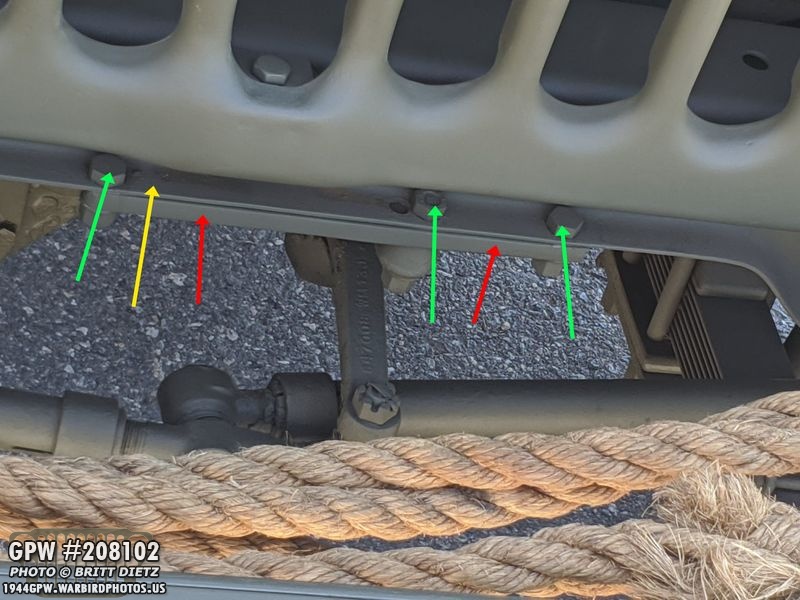
That’s it for the overall items, here’s some more detailed looks. Looking at the cross member under the grill, you can see the CJ2 steering system that is attached. The yellow arrow points to the cross member, which is a part of my Jeep’s frame. The red arrows point to the long bracket that holds the bell crank above the front axle. The green arrows (which are also on the other side of the cross member) are the bolts. The bar, bell crank, and bolts will be removed and the holes welded over eventually. All this will be, at least, removed when I add the GPW axles. The reason they moved the steering pivot to the cross-member rather than where it was attached to the front axle is the same reason a torque reaction spring exists for the wartime front axle. When applying the brakes, the front axle will roll forward slightly, and when the steering was on the axle, that would ‘pull’ on the drag link, causing the Jeep to turn left as you braked. Post-war, they moved the steering to the cross member, which didn’t move when you braked.
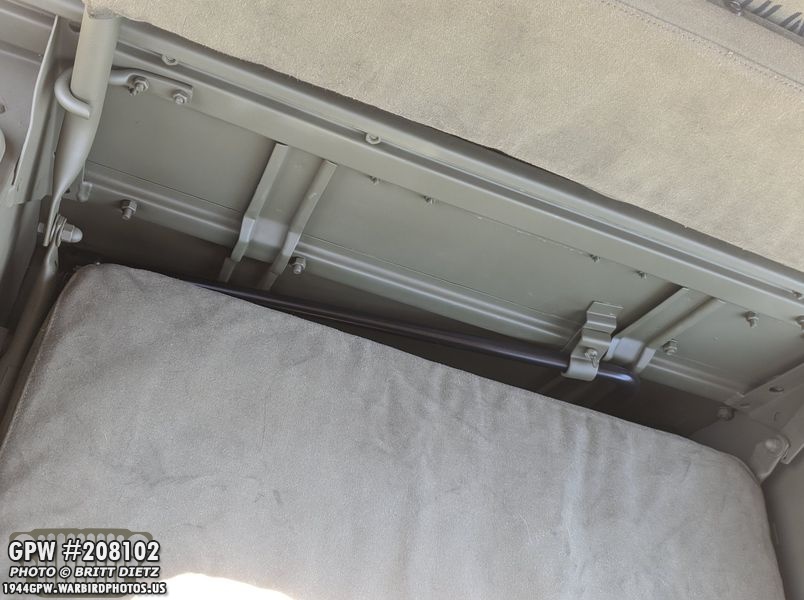
First, look how nice that GPW hand crank is in that satin black! So happy to have that on the Jeep now! (see last week’s update). To the top left, you can see one of those J hooks holding the backrest up for the rear seat. I could only get this side on because the rear seat is shifted over too much one direction. Could be a bad design of the repro body tub. I also need to replace the bolts on the top part of the seat to the bottom part with rivets.

And I wanted to quickly point out how nice it is to have BOTH the tire pump under the rear seat and the hand crank (in the back) in the Jeep! Two ‘extra items’ that I had waited patiently to find, then restored them both!
So that’s the latest, still things to do, but a lot of the things require waiting for this or that. Like for the combat rims… in order to get the combat rims on, I need to first get the combat rims, then put the flaps, tubes, and tires on them. Then I need to complete the full restoration of the axles. To complete the axles, I need to repair the rear axle (needs brazing for a small crack) and get a new ring and pinion, which I’m waiting on currently. So once I get the ring and pinion, then I can start going through that list to get to, eventually, the combat rims. This is why I’m stuck, but still have things to do.
I’ll still refine my research and replace small things when I find out about them. This bolt should be F stamped? Okay, I’ll add it if it’s seen easily. If it’s under the jeep or hard to see, no rush, might not even replace it. The original body tub will be the most amount of work. When I begin to work on that, this page will be weekly updates of that long-term project. But overall, I’m, happy with the Jeep and how she looks.

And the best part is, I can drive her! She runs and I have fun taking her around town. Though, as you can see from this photo, I’m quite tall and that darn canvas top likes to pat my head when it’s windy.

As mentioned earlier and in the last few updates, I’ve been researching voltage regulator inspector stamps. I gave up on stencils and switched to custom rubber stamps I had made using photo reference. After testing all sorts of different paints, I’m still wary about stamping it until I’m sure.
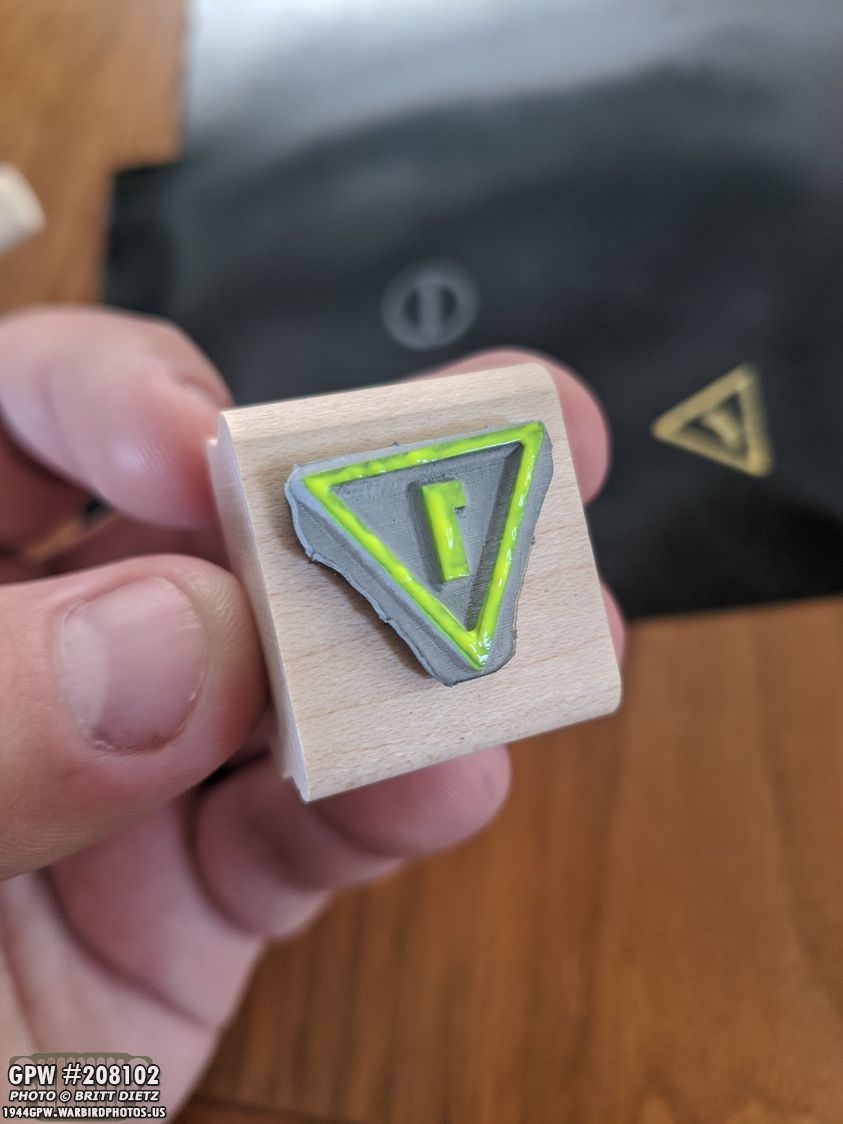
The stamps work well, but it’s the paint/pigment that I’m having the most issues with. I only get one shot at stamping it, and I know I’m taking way more time with this than the inspector would in WW2… but I want to get it right.

So far, all the acrylics and model paint come out smudgy and too liquidy like the top image in my tests on the scrap metal I painted with the same wrinkle paint as the regulator. The bottom stamp is with an ink pad, which I was told is MUCH more like a typical inspector’s stamp, the problem is it fades quite a bit. So trying to find a way to somehow get a more vivid pigment stamp. Once I have that, then I’ll feel ready to stamp it.

And here’s a look again at least week’s update on the early 1941 jerry can. While it looked seriously rusted and had several layers of paint, including wartime paint and primer… it’s slowly cleaning to a nice silver metal again. I will probably restore this back to looking good, but still think I’d rather wait for a 1943/1944 jerry can instead for the Jeep.

One thing I meant to but didn’t get to this week which I hope to do next week is to remove the post-war bolts holding the oil filter brackets to the oil filter engine bracket and replace them with correct F stamped ones. Hopefully, that’s something I’ll get to this weekend.

I also went out and got myself a Flux/MIG welder. Yes, it’s a Harbor Freight welder, but it has really high reviews and should work great for Jeep bodywork. The problem is, I need to learn how to use it. So I’ve been starting to do test welds on scrap metal to practice. Once I feel ready, I’ll begin work on the tub.
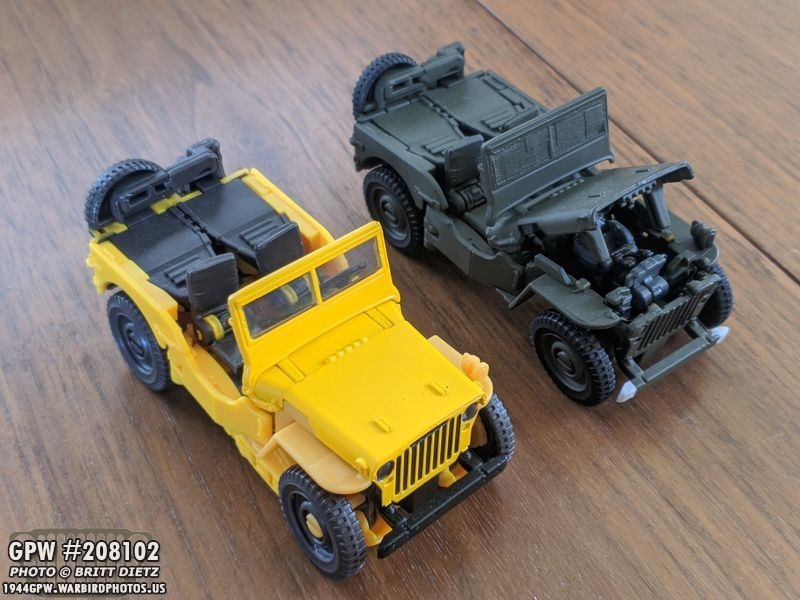
And someone last week asked me about my repainting of a transformers bumblebee toy. In the most recent Bumblee movie, Bumblebee transforms into a MB Jeep at one point in the movie (a bright yellow one). They released a ‘studio series’ toy of that, and I picked up two. I’ve been repainting the other one the same as my Jeep with the same 33070 OD Green, Ford Engine Gray, etc. as my Jeep. Here’s how it looks so far. Still need to touch up some areas before I remove the masking.
As this update draws to a close, another look at the Jeep on the golf course. I hope to find a way to better categorize the updates I’ve done on this page for the last year and a half. I know some people come here looking for ‘that post where I restored/took apart/added this’, and it’s a needle in a haystack, even for me when I try to find a particular update. So I might make a ‘quick jump’ of various projects I’ve done throughout this restoration for quick reference, and I’ve toyed with making a blog version of this page so people searching for help through google might eventually find their way there.

So that’s it for this week! Next week will have a lot more to update…Until then!