 Transmission’s the name!
After unsuccessfully solving the clackity sound the last two weeks, it was time to dive into the last unexplored frontier on my Jeep… the transmission! This is the ONLY thing not completely restored. So, this week I started prep work to remove the transmission and transfer case from the Jeep. I show how to safely remove it while the body tub is on, separate the transmission box from the transfer case, and how to completely disassemble the transfer case! This is the start of another very big multi-week project!

I had hoped to take a month off from any more major projects on the Jeep after spending nearly two months doing the axle swap, but… the Jeep had other plans! So let’s dive in…

A super quick recap… my Jeep had CJ axles on it when I got it. I restored original 1943 GPW axles over a year and the last two months, I did a swap also restoring the springs, shocks, and adding a brand new brake system. The first test drive resulted in a strange clackity sound coming from somewhere under the Jeep. I completely reopened the rear axle and redid everything in the housing, replacing the gears in the carrier. Sadly, that didn’t change anything, so it was time to look elsewhere.
At this point, the LAST thing left on the Jeep that hasn’t been completely restored is the transmission. It all worked, so I never took it out and restored it back when I was doing the frame off restoration. The focus of the clackity sound, since the axle was gone through a second time, has changed to this. I always planned on taking it back out and doing a full restoration, but I wanted to wait a month or two before diving into it since it’s the very last thing on the Jeep. Not to mention there’s several oil leaks, as these T-84s do.

So, let’s get started on taking it apart! First step is an easy one, take out the drain plug under the transfer case to drain all the oil. It will drip for what seems like forever, so give it a few hours to finish dripping. I used a large turkey roasting pan underneath to capture the oil.

To help with the oil draining, I also removed the bottom oil pan once it stopped dripping. I also wanted to take a peek inside the transfer case at the gears. There are 10 bolts holding the pan on. They can be a little tough to get to, so I recommend using an extender on the rachet. You will also need to disconnect the e-brake cable from the e-brake, otherwise, you can’t get the oil pan out. You can see the markings on the pan where the cable rubs against it.

And, pretty cool, all the bolts on mine are F stamped. In fact, my transmission and transfer case look to be loaded with original GPW parts. Almost all the bolts are F marked on both items.
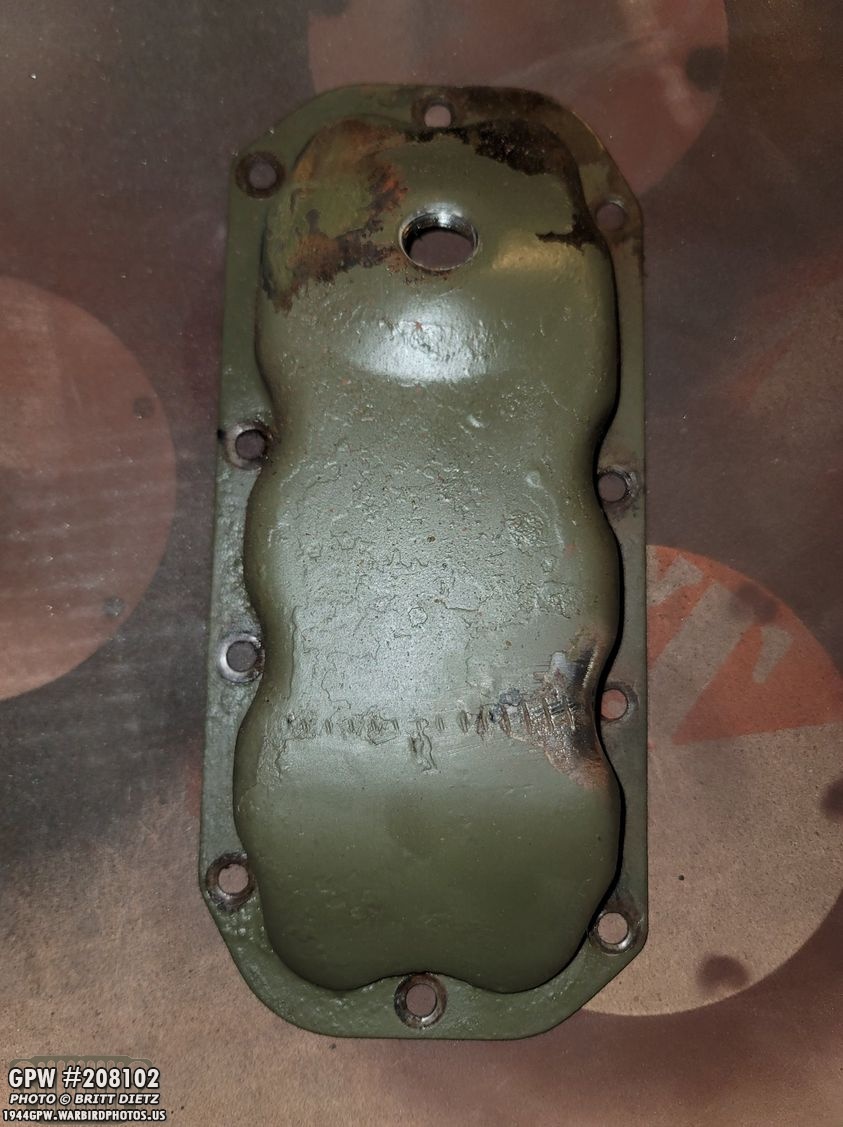
Here’s the plate removed. As with everything I take out, it’ll be stripped of paint, sandblasted, and repainted.
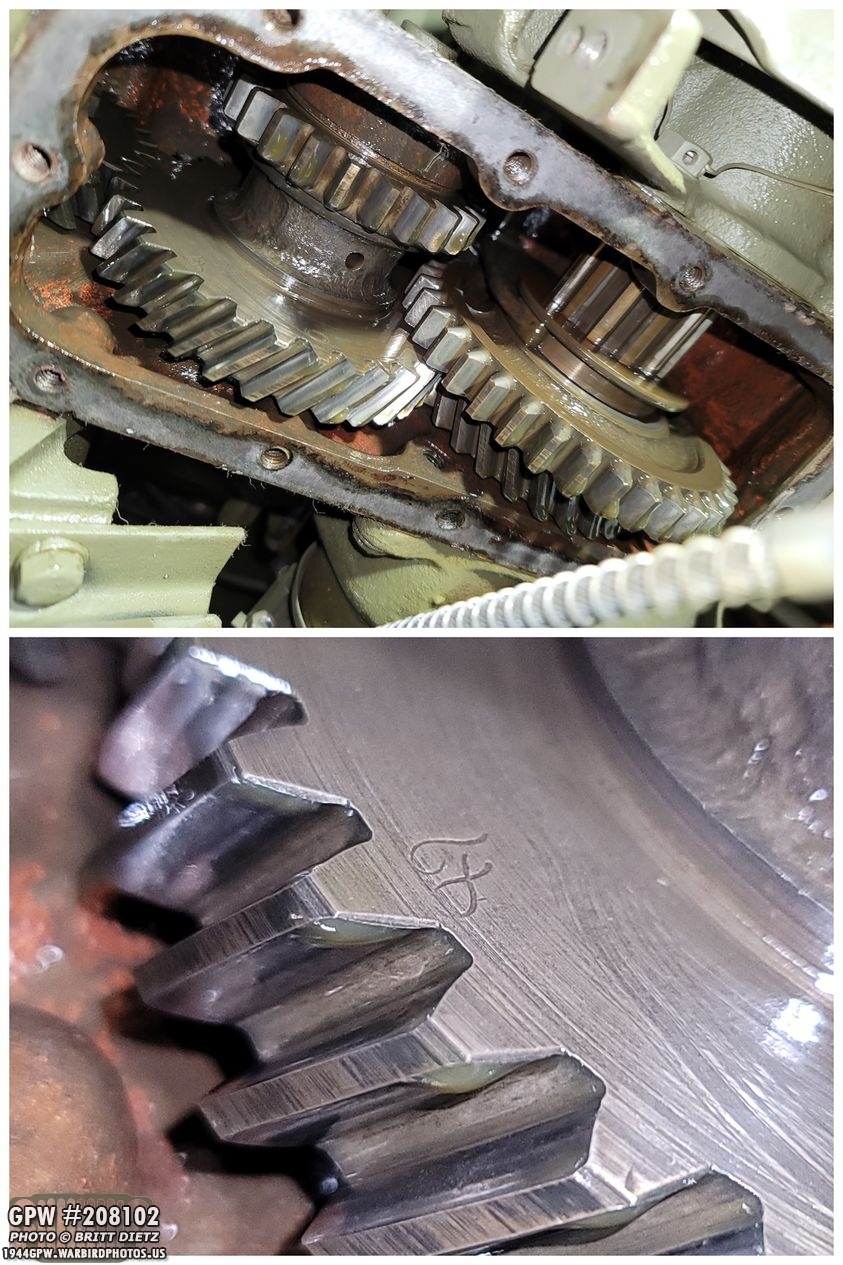
Taking a look at the gears inside the transfer case, right off the bat I noticed the large 999 gear (bottom left large gear in the top photo) has a nice F stamp. Overall, the gears look pretty good, but there was a pretty large backlash when turning the rear drive shaft. Possibly the cause of the clackity sound.

Moving on, next step is to drain the oil out of the transfer case. This can vary depending on which version of the T-84 you have. The fill plugs are in different configurations.

Once that is drained, it’s time to remove the first items. You need to take the transmission cover off the inside of the Jeep. This will give you access to the top of the transmission.

From there, you need to take off the shifter cover. There are four bolts holding the cover. Once off, you can take off the screw-on cap that holds the shifter to the cover. You can then take out the shifter and you’ll be left with all this. I also took out the shifter plate (middle left).

I discovered one big reason for leaking oil… the cover gasket was ripped and folded over, so it was seeping out there.

Also, inspecting the shifter plate, I noticed that someone has welded a U shaped piece of metal to the two rails. It’s a nice weld, done professionally, but an odd addition. Possibly to fix a cracked rail? At any rate, I’ll need to get a new plate. No F marks on it, so I don’t think it’s original.

A little bit of investigating on the cover, there’s no F stamp or GPW number.

On the underside, it has T84A-148. At the time this was the only marking I could see. But later in this update I wire wheel the cover and discover a little more.
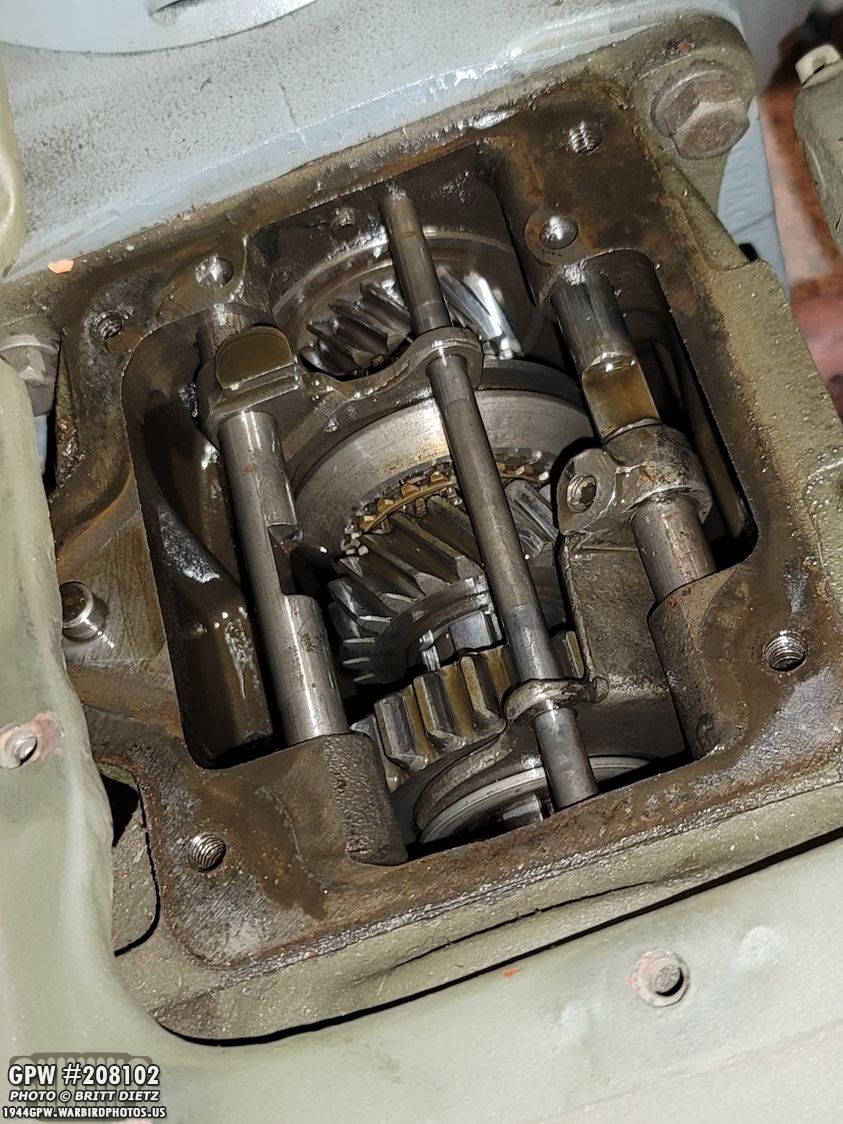
Moving on, with the transmission cover off, this is what you should see through the body tub in the Jeep. You’re all done here! But it’s a nice look into the transmission. A preview of what’s to come.

To continue with the removal, the next step is to disengage both driveshafts from the transfer case. I opted to just take both of them out completely. (Photo shows the shafts still in place)

There’s actually a lot of things to disconnect in order to drop the transmission out. 1) Clutch crossover bar to Frame bolts (two)2) Clutch crossover to pedal bar (remove the cotter pin)3) The gas pedal spring4) The engine hold bar5) The clutch cable to clutch crossover tube (remove the cotter pin)6) The clutch crossover tube itself (which will come out easier as you start to move down the transmission)7) I had a large bond strap going from the bottom of the tub to the crossmember. It should go from the tub to one of the screws on the back cover of the transfer case. Either way, it needs to be removed.

You also need to remove the speedometer cable from the other side of the transfer case. It just screws on.
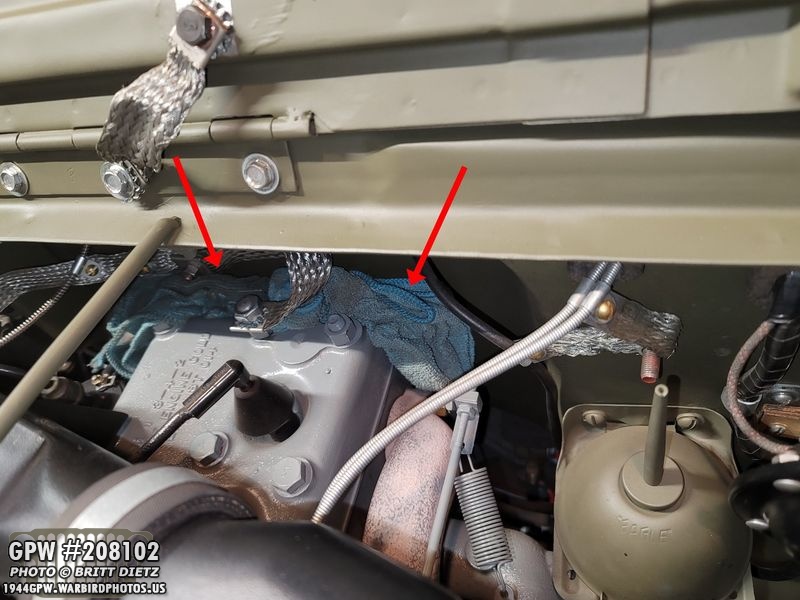
Since you will be dropping the transmission and it’s connected to the engine, the engine tilts down to go with it. Remember, the engine is NOT held to the frame on the rear, it’s held to the transmission which is held to the crossmember. So once those are taken away, the engine will tilt back towards the firewall. You will want to loosen one of the radiator straps for the top crossover tube, and stuff some rags behind the engine so when it hits the firewall, it won’t scratch up things.

I was going to use a floor jack to lower the transmission, but I found this awesome transmission rolling floor jack at Harbor Freight! This made the entire process SO much easier. It was worth the price and will be even more worth the price when I go to put the transmission back in. You roll it under the Jeep, and use a rachet to raise the bar up to the transmission crossmember. To begin, you want it to be only slightly resting against the bottom of the crossmember and centered under the transmission.

Now comes the fun part, and the moment of truth. Remove the three bolts on either side of the crossmember in order to detach it from the frame. I recommend doing the side ones first, THEN doing the top one. Makes things much easier. It shouldn’t move downward much because the transmission jack is under there and it’s still connected to the engine.

With the three bolts gone on either side, the crossmember will be fully resting on the transmission jack. This jack comes with a rachet strap you can put around the transmission to hold it (since the transmission is a weird off-center weight and heavier in the backside). I recommend doing this to make sure it doesn’t flop backwards after the next few steps. With the crossmember sitting on the jack, you can go ahead and lower it down about three inches. You should see the engine tilting downward with the transmission as you lower it down. Don’t go too far just yet.

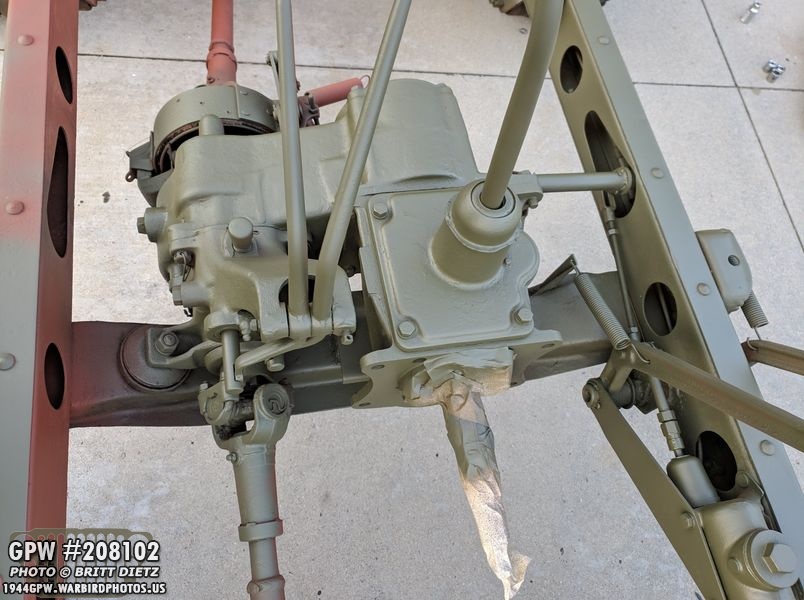
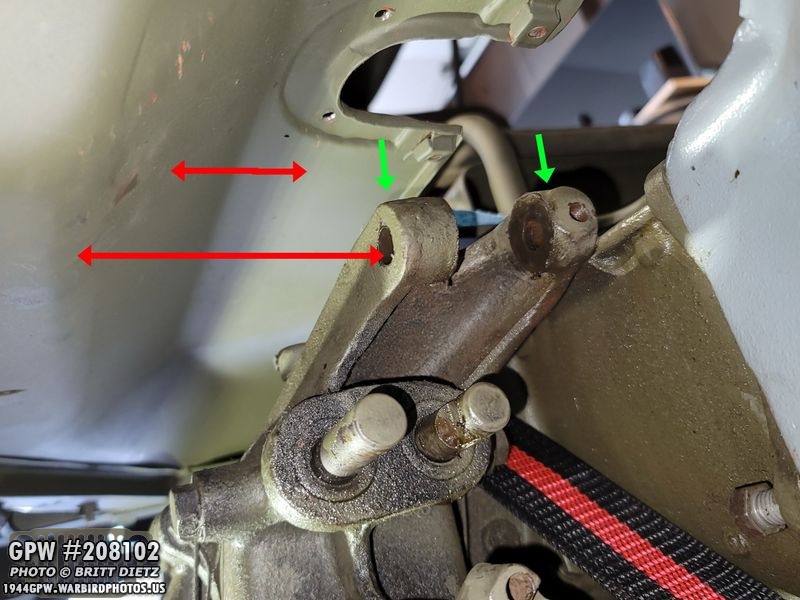
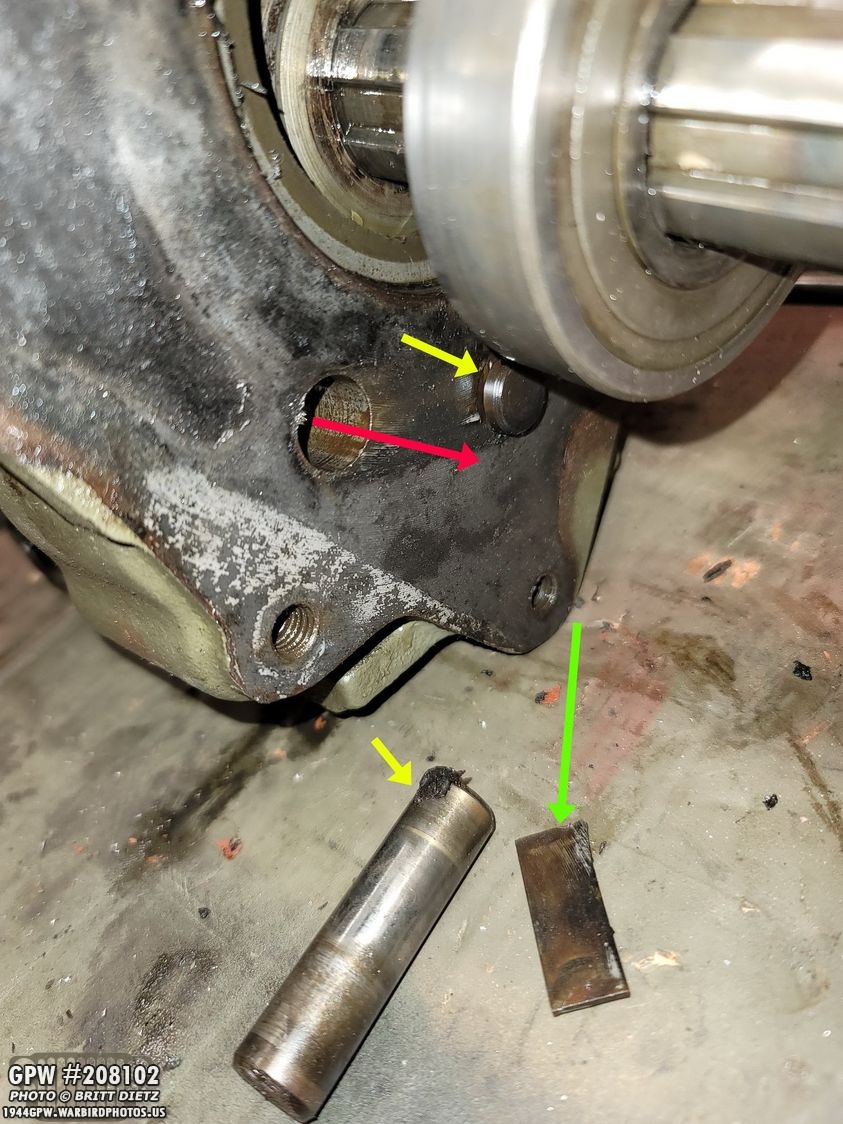
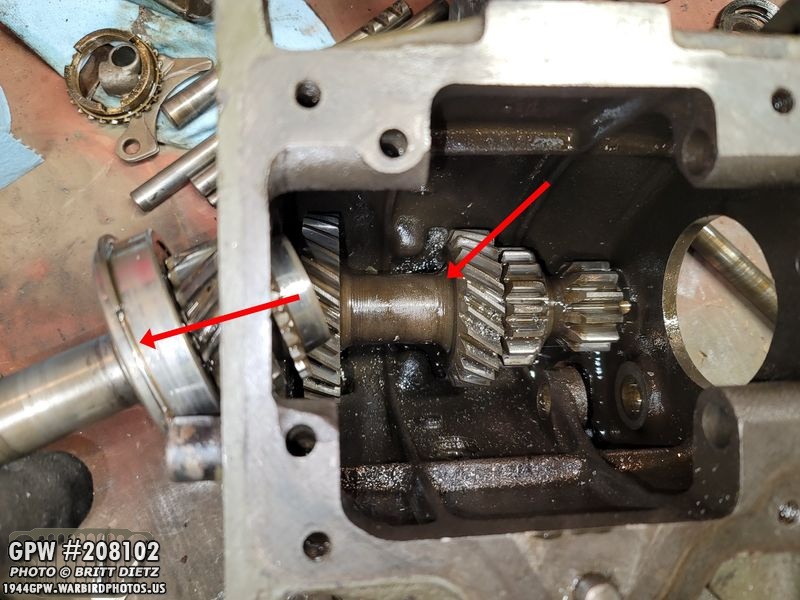
The reason for dropping it only about 4 inches is simple.. you have to get the transfer case shifters out! You cannot get the transmission out with the shifters still in there. And the only way to get them off, is to remove the pin that’s holding them to the transfer case. Here’s a shot of them without the body tub on for ease of explaining. You need to first unscrew the wedge bolt (orange arrow). This will allow the shifter pin to be moved out away from the transmission case (red arrow direction). But there’s a problem…
When the transmission is up in its normal spot, there’s no room to get that pin out because it will hit the body tub hump. So, but moving the crossmember down about four inches, you have enough space to drive out that pin (away from the transmission case). The two shifters will then just fall right out to the floor. Some people will cut a hole into the side of the tub hump to be able to get that pin out without having to move down the transmission.

Here’s a look at that pin. On the left is how the wedge screw screws in and locks that pin in place. The right photo shows just how worn down my pin is! I’ll have to replace that for sure. It does have a zerk grease fitting on the end (not shown in the photo) so you can grease the shifters.
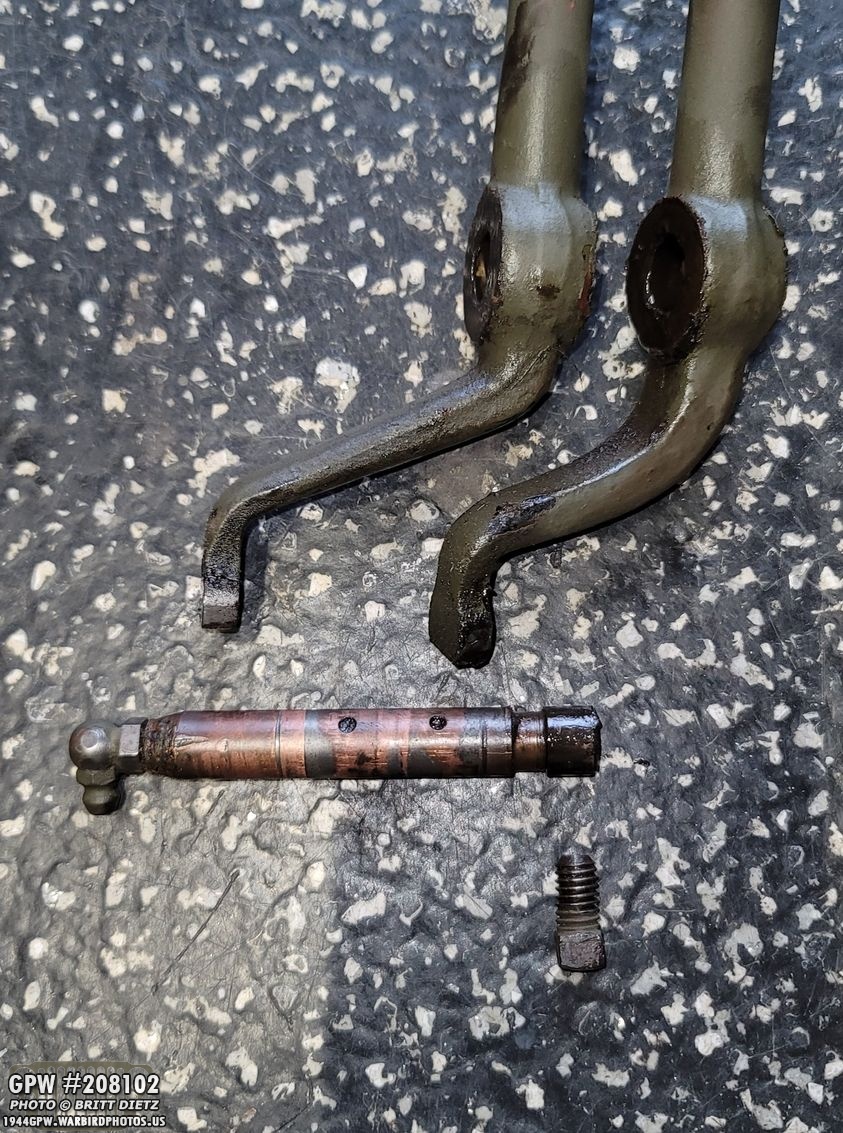
And here’s the parts when they are out. The two shifters, the pin, and the wedge bolt.
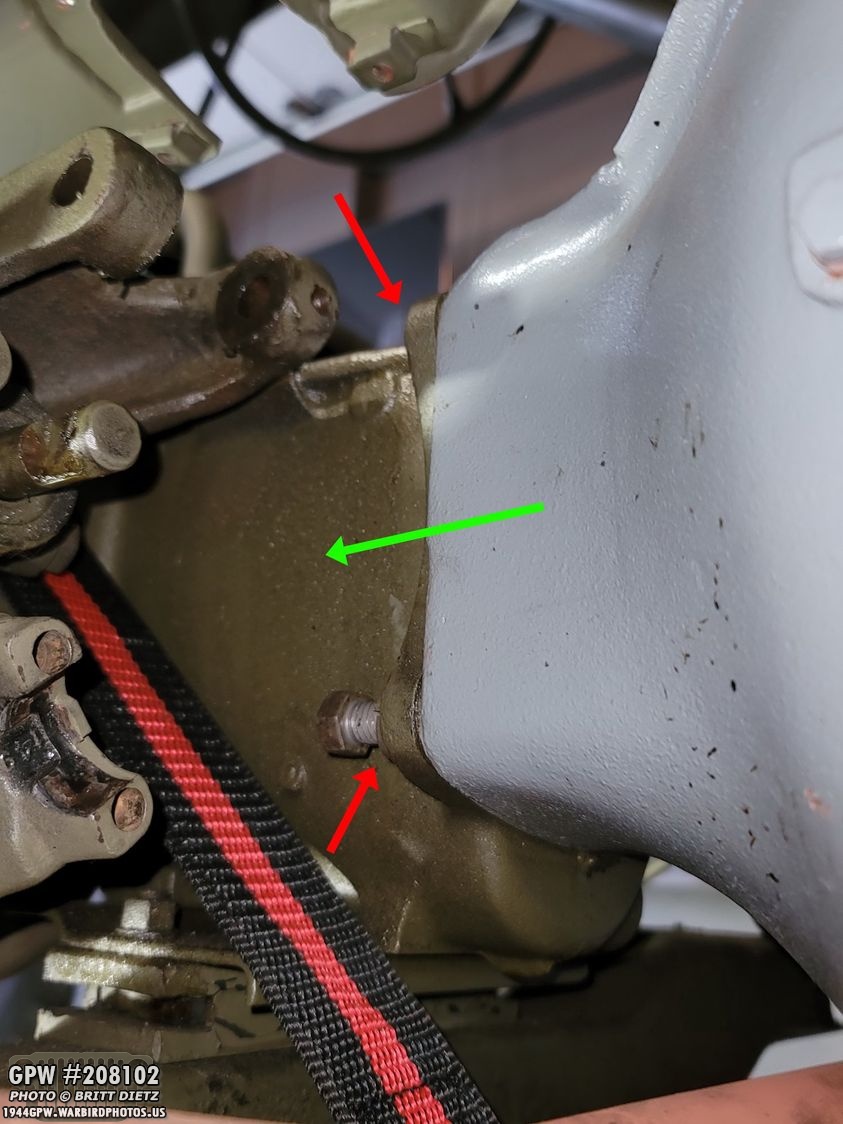
The last step at this point is disconnecting the transmission case from the back of the bell housing. I’ve already restored my bell housing back during the initial restoration in 2019, it just needs some cleaning and a touch of paint in spots. So I don’t plan on taking it out. There are four screws holding the transmission case to the bell housing (two are shown, red arrows). After they are detached, you just simply need to lower the transmission jack a bit more and start pulling everything away from the engine. I recommend putting a jack or something under the back of the engine oil pan to keep it from dropping too far down, but it should rest against the firewall. Make sure to keep the engine and the transmission aligned at the same height/angle as you pull them apart. For me, it came apart pretty easy with some wiggling. The transmission jack is on rollers, so I was able to roll it away, then lower it all the way down once it was free of the engine.

In my excitement to get it out, I didn’t get any photos of the detachment from the engine, but here’s a look after I lowered the transmission jack to the floor, then took my crane and lifted the rear of the Jeep up as high as I could to then roll the jack out from under the Jeep. Even at the lowest the jack would go, the top of the transmission was too tall still to just roll out without lifting the Jeep up. Here’s right after I rolled it out, excited that the process actually went better than I thought!

Before moving the transmission to the workbench, I needed to separate it from the crossmember. There are two studs from the bottom transmission mount that go through the crossmember. The nuts can be removed. On the transfer case side, there’s a large ‘donut’ mount with a large bolt through that which will need to be removed. Once those are off, you can pull off the transmission (I used a crane to help with that).

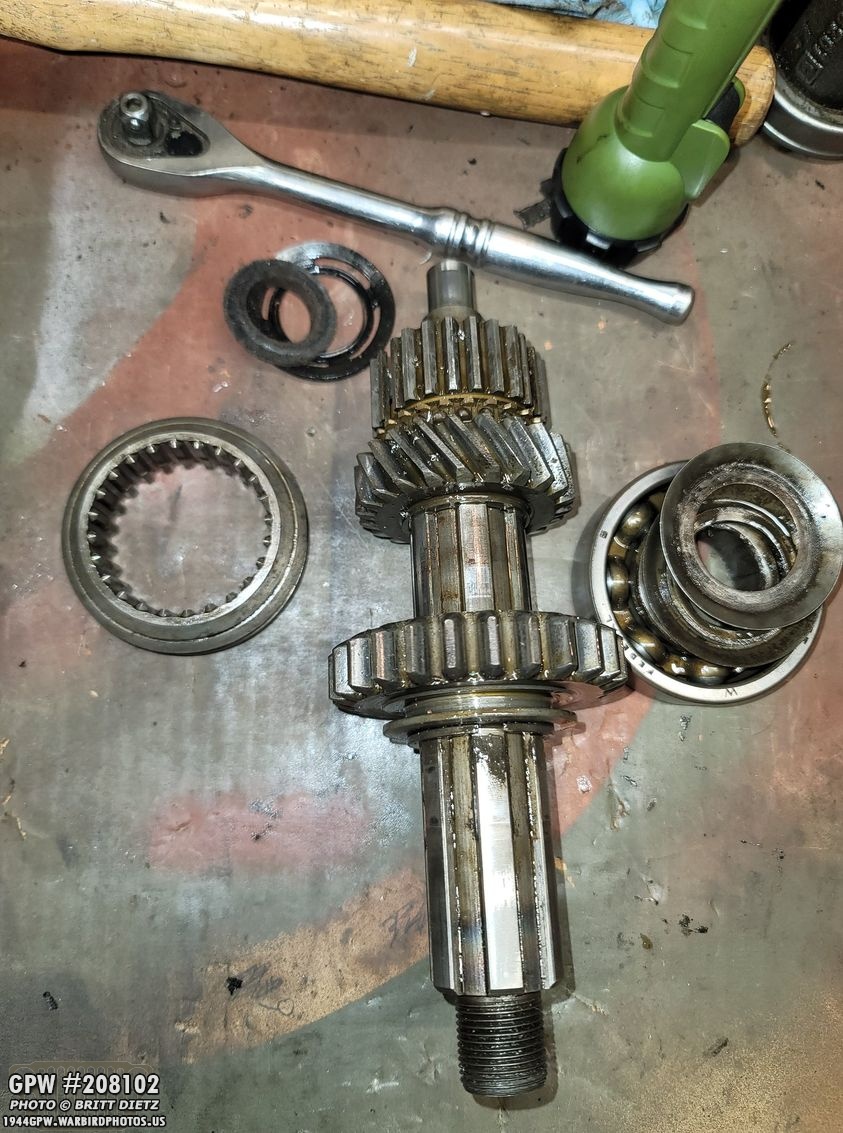
And here’s the transmission fresh on the workbench! Without the crossmember and not under the Jeep, it’s a lot smaller than it appears.

I wanted to dive into this right away by taking off the transmission (shown here) from the transfer case.
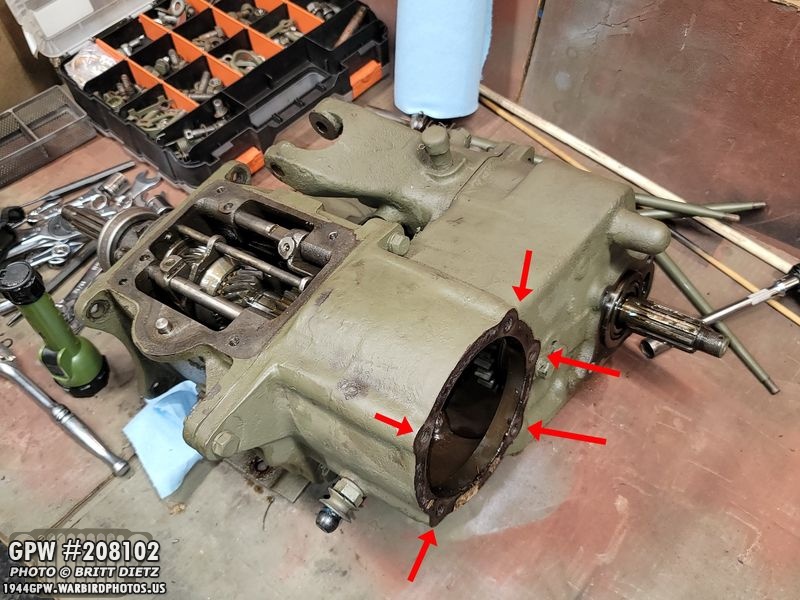
First thing, take out the five bolts holding the backplate on the transfer case.

Inside the area you just revealed with the plate gone, you can see the main gear that transfers power from the transmission to the transfer case. This will need to be removed first. First thing needing to be removed is the special castle nut holding the gear onto the back of the output shaft.
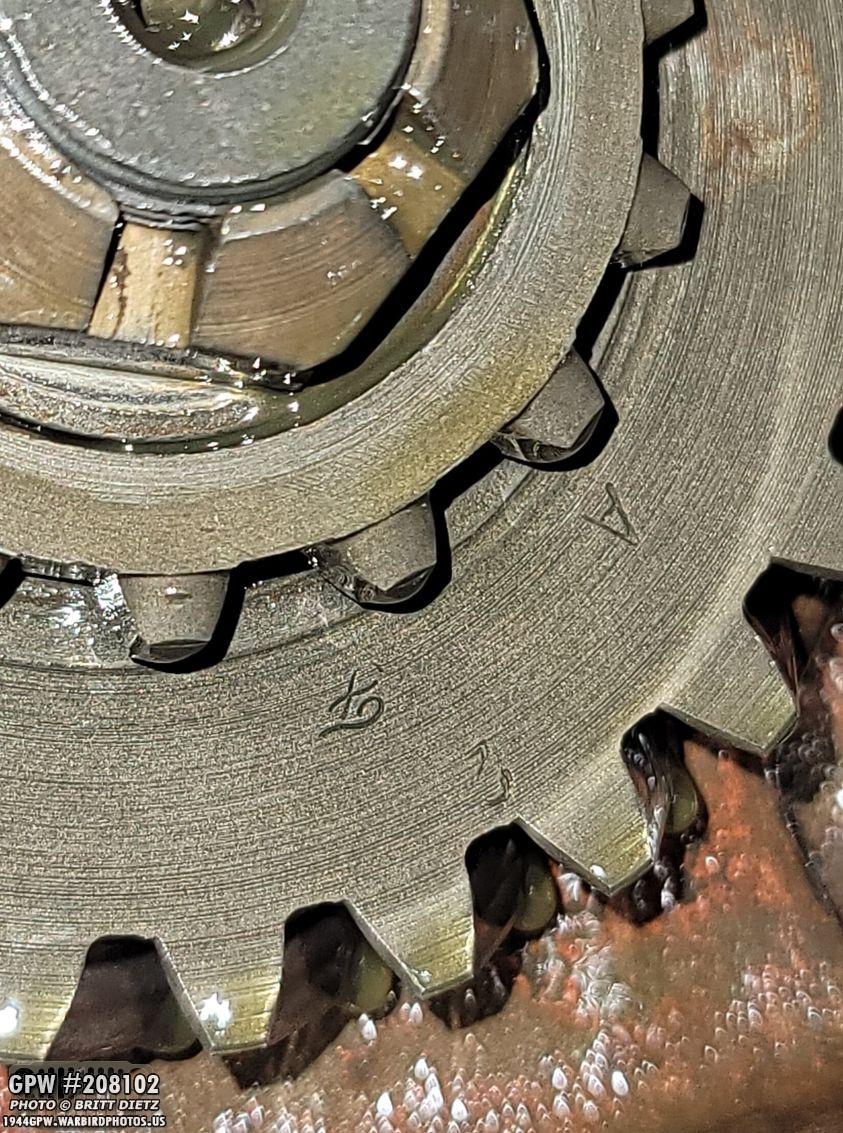
Before we remove it, I happened to see an F stamp on this gear!
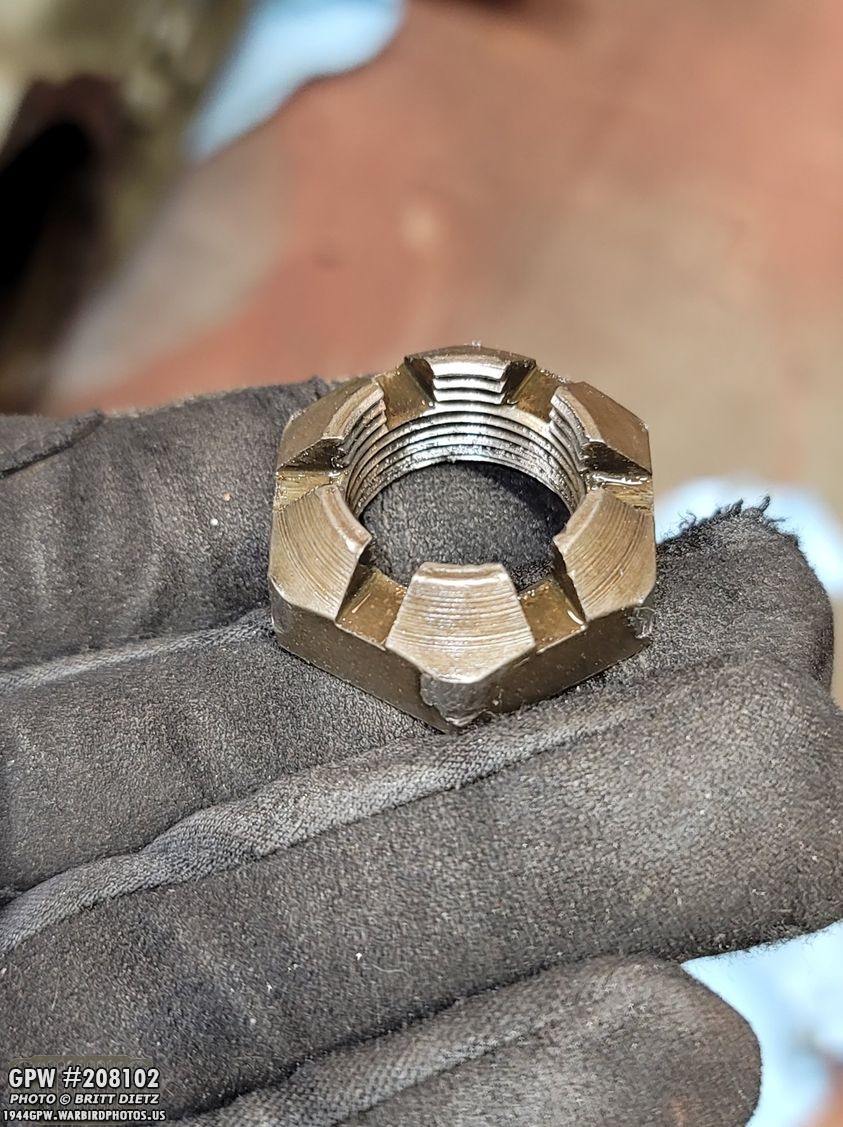
I used a large 1 inch by 3/8 socket to get that special castle nut off. Also, an air impact gun got it off without spinning the gears.

You can then just slide off the main gear super easy!

Now, all you need to do is disconnect the two cases via FIVE bolts. There are three on this side (one of which is often not realized that there’s one underneath on the bottom).
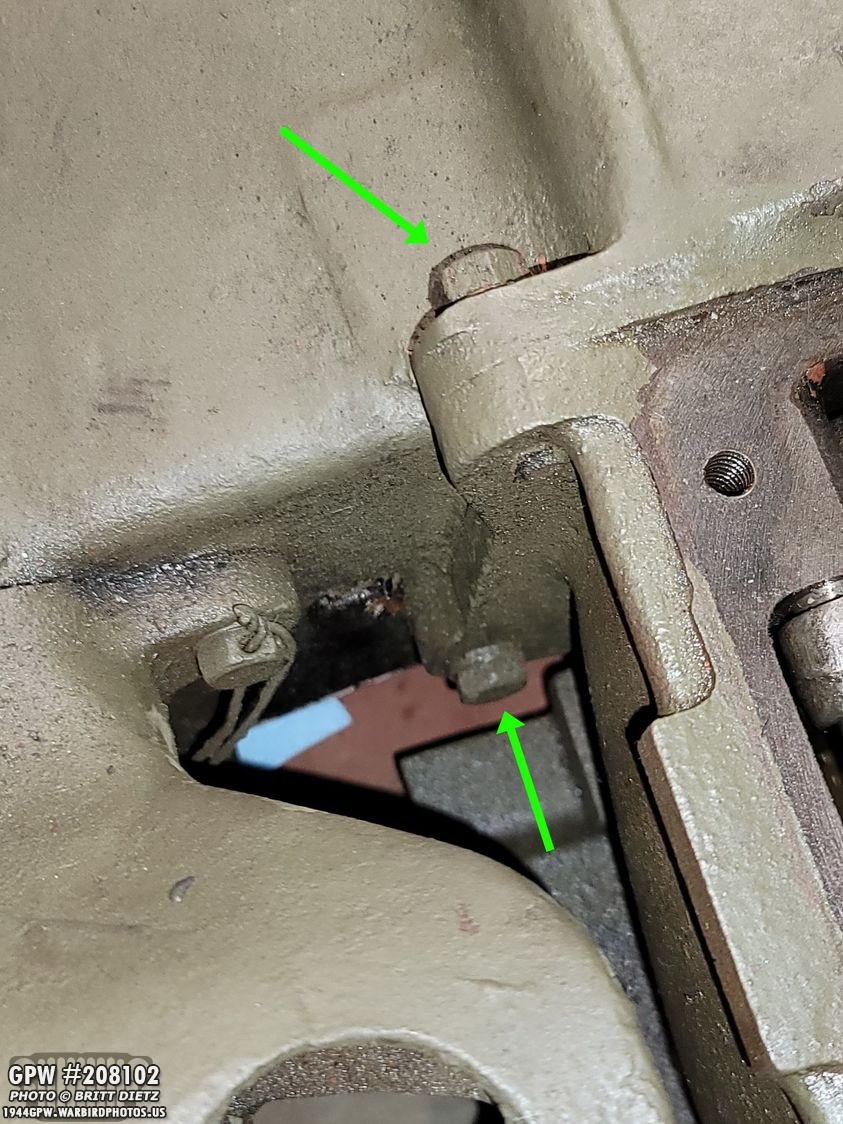
On the other side, there’s two bolts, one of which is facing a different way than the other four.

With the bolts out, you should be able to separate them. For me, it was stuck together. The paper gasket between them was acting like a super glue, and it took the rubber mallot tapping the transfer case and a small screw driver to break the seal and get them started to come apart. The large bearing you see on the output shaft (bottom center) will either come off one the output shaft, like so, or it will be stuck in the transfer case and not go with it.

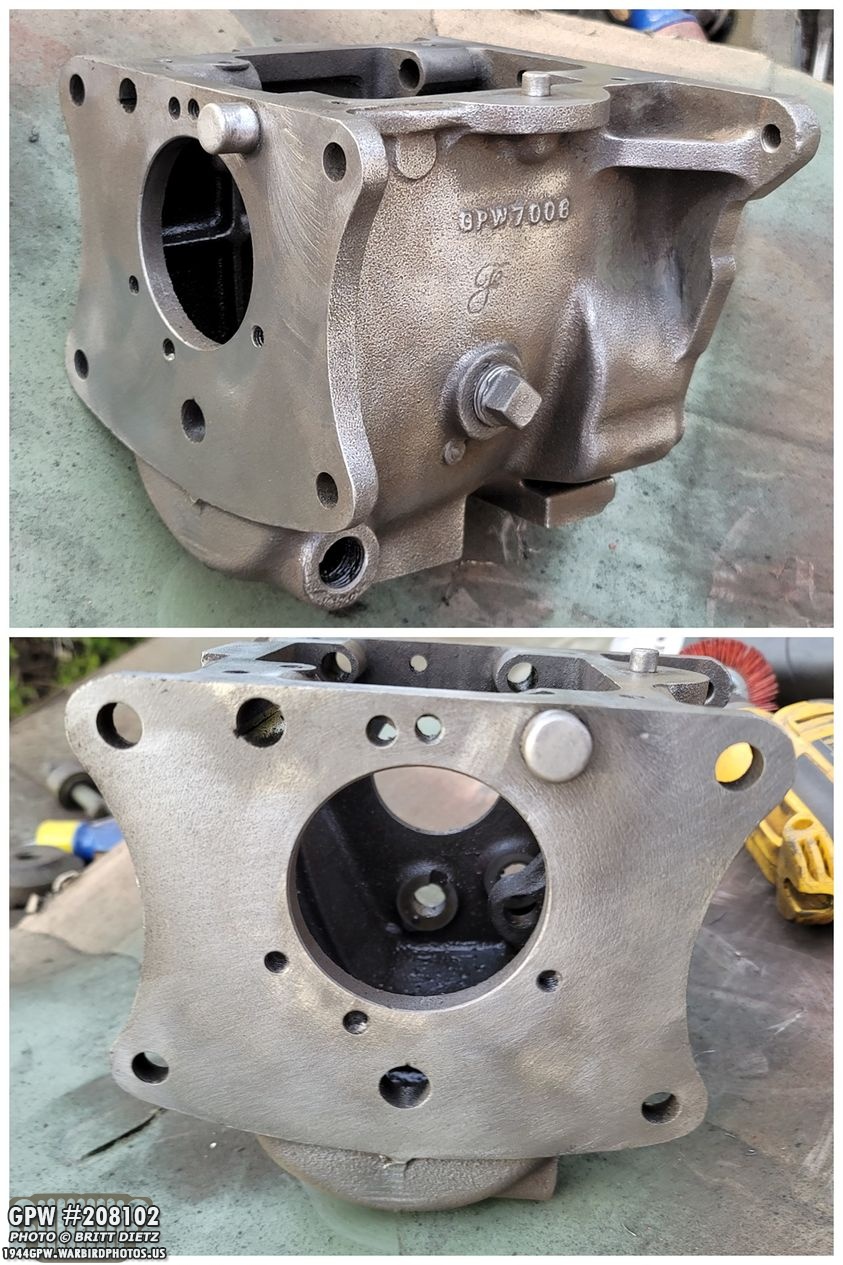
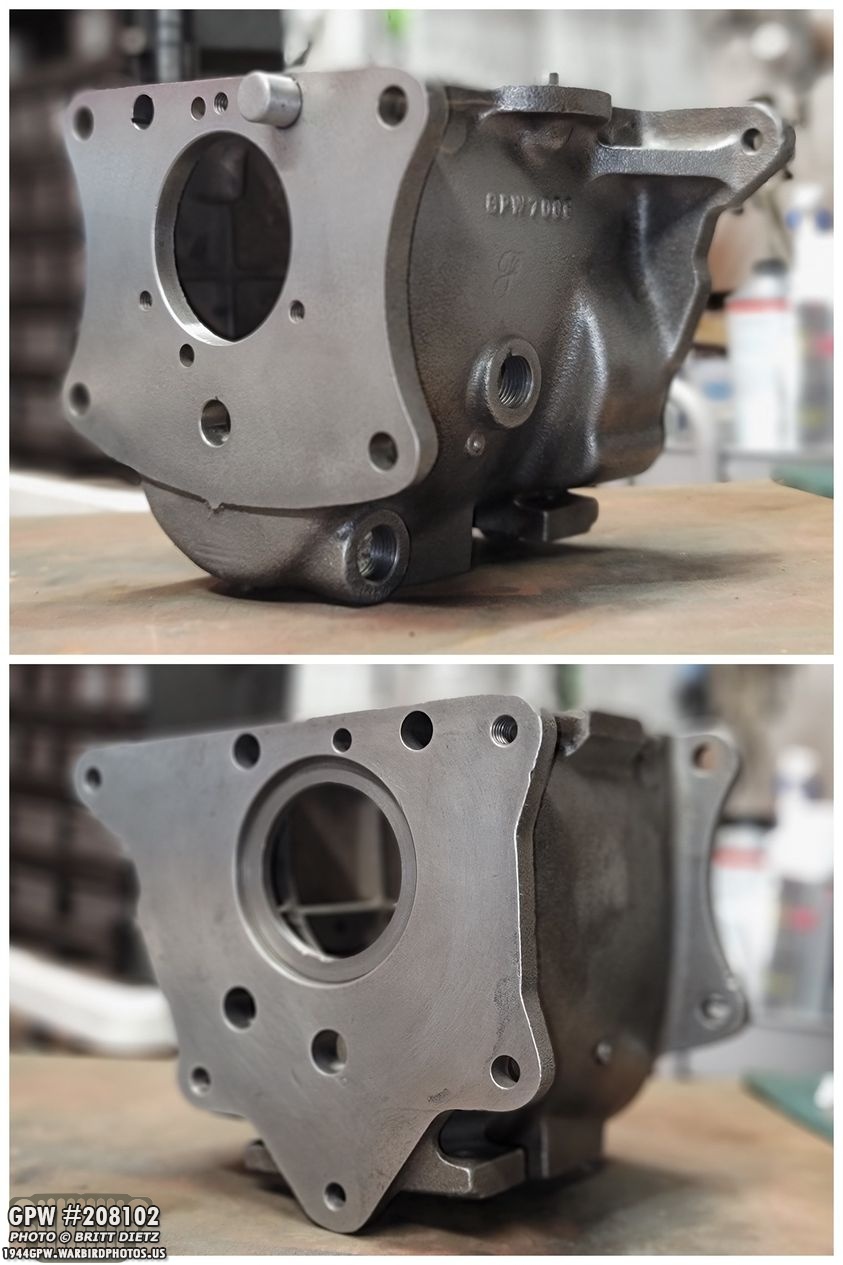
I took this moment to check out the newly separated transmission case to look for markings and any other interesting tidbits on it.
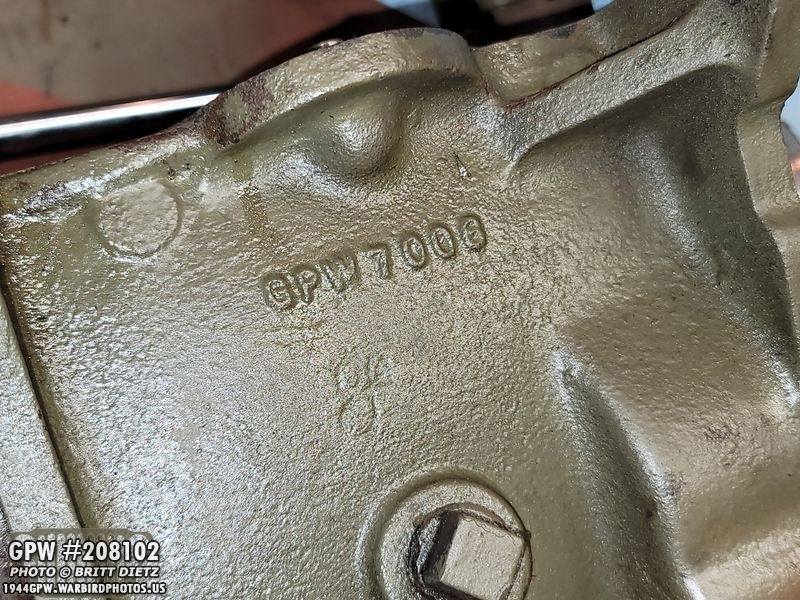
Of course, the GPW 7006 number with a large F stamp on the side.
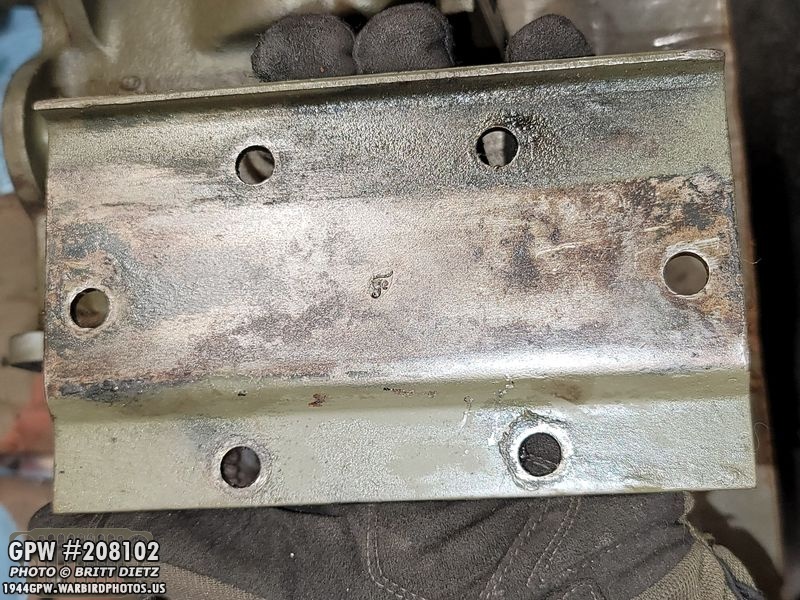
I removed the mounting plate from the bottom of the case, and noticed a nice F stamp (which is otherwise hidden). this mount plate is what mounts the transmission case to the crossmember.

After I removed the input shaft cover (three bolts on the front of the transmission cover, then slides right off), there was a felt washer and someone added an interesting rubber seal on there (shouldn’t be there).

Now it’s time to take apart the innards of the transmission! First things you need to do is drive out the shifter guide rail (red arrows). Then, you need to unscrew the special wedge pins from the shifter forks (yellow arrows), but these are not ordinary screws…

There’s are tapered pins/screws that wedge the shifter forks on the shafts. They use a special type of tool that doesn’t really exist anymore. It almost look like an allen wrench, but it’s not. I was lucky in that an allen wrench was able to successfully take one of them out. However, the other one in the other fork, someone over tightened it and totally stripped it to nothing (not shown in either photo). I ended up having to drill out the pin, which wasn’t fun and got metal shavings everywhere. Ugh. But, I eventually go both shift forks to be loose on the shift fork shafts.

You can’t just take off the shift forks, you need to DRIVE the two shift fork shafts out (red arrows) and then the shift forks will just fall off. BUT A WORD OF CAUTION!!! (see next image)

WATCH OUT! In these two spots, there are ball bearings (called poppets). They are SPRING LOADED and push against the underside of the shifter fork shafts. If you drive out the shift fork shafts without putting something over these holes to stop them, THEY WILL SHOOT OUT INTO THE AIR LIKE A BB GUN. They have a lot of force and can possibly hurt you. SO MAKE SURE YOU are ready to block them from shooting out as you drive out the shifter fork shaft. You can see the top shaft has been removed and the ball is in that top hole. The bottom shaft isn’t completely removed, and that ball shot into the air on accident. Thankfully, I was able to recover it and my face wasn’t near that area.

Here’s a closer look at that ball bearing/poppet. Just be careful! If you cover the holes as you drive the shafts out, they will just hit your hand/screwdriver without much force and stay sitting on top of the spring. You can then pull out the balls and the springs.
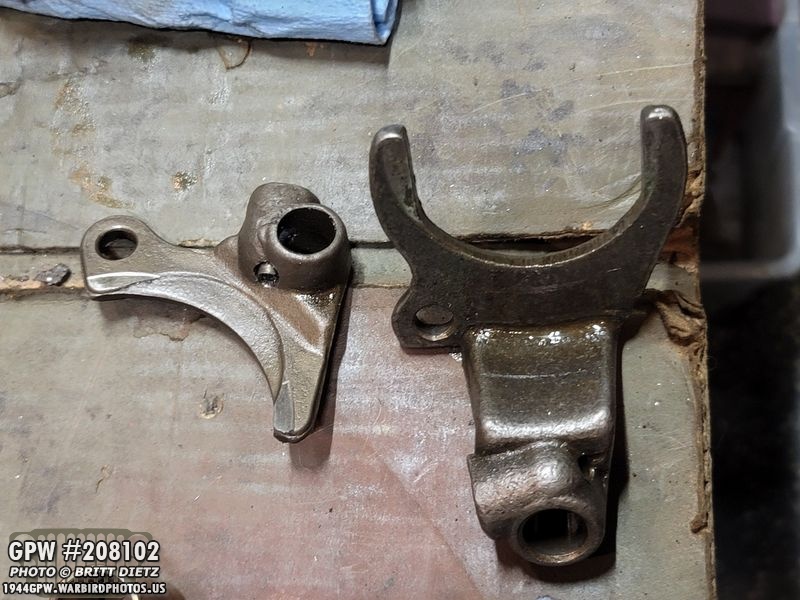
With the shafts out, you can just lift out the two shifter forks. These are not F stamped, so probably replacements.

Here’s a look at the guide shaft, the two fork shafts, and the two forks. I’ll be replacing all these items. The shafts didn’t have F stamps on the end of them, so I believe they are replacements as well.
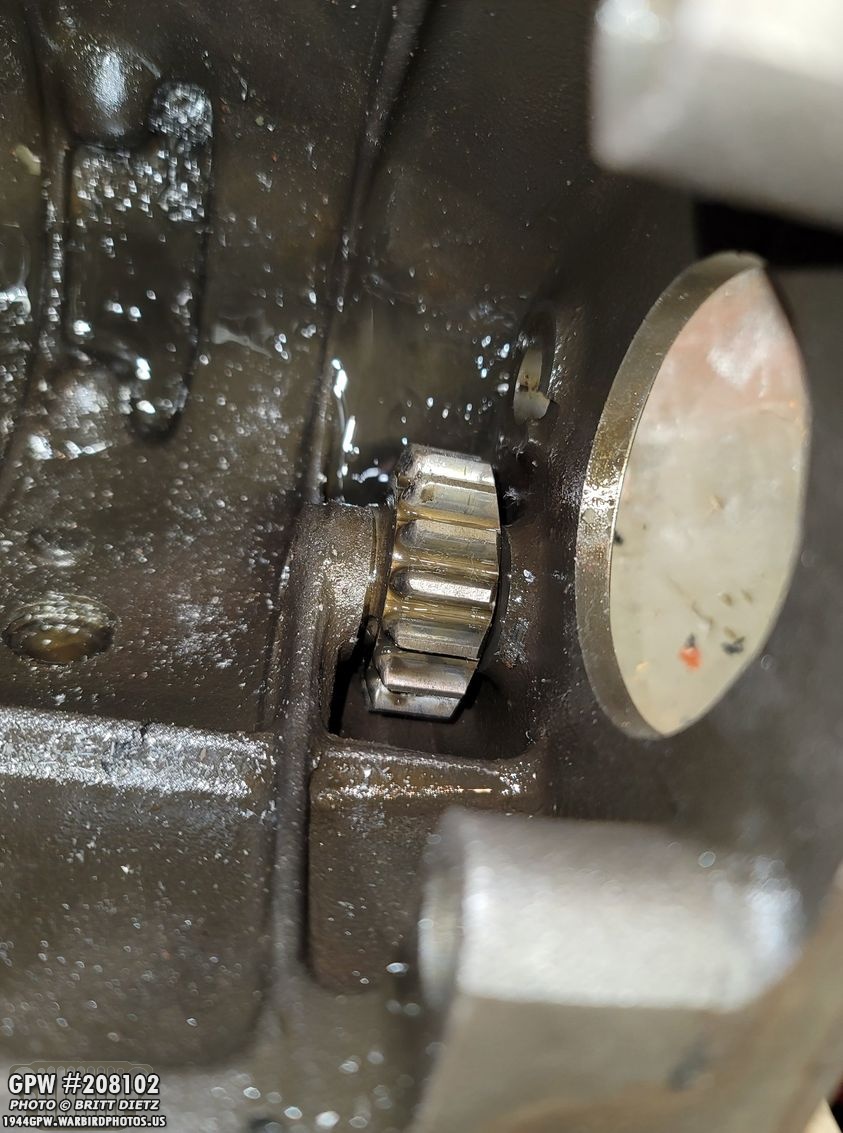
Next up, on the back of the housing there are two more shafts just slightly sticking out with a small plate of metal holding them from being driven in. Tap out that small plate (green arrow), it’ll fall out really easy with one tap. You can see the slots in the shafts that hold that plate (yellow arrow) Then, drive out the small shaft that’s holding the small reverse/idle gear in the bottom corner of the case. Carefully drive it outward (red arrow).

Before I went any further, I wanted to remove the bearing from the back of the output shaft. You can see here, there’s two cupped washers on either side. There should only be one cupped washer on the inside of the bearing along with a thrust washer and a large snap ring. That outer cupped washer is incorrect and shouldn’t be there.

I used a bearing puller to pull the bearing off. Pretty simple.
I was then able to carefully finagle the output shaft out of the case. If you can’t get it out, don’t worry, you can do it later. But I was able to move it around in the case just right to where I could move it past the input shaft then pull it up and out of the case from the inside. That large gear with the teeth on the inside to the left is the synchronizer cage gear that was part of this shaft. Also, don’t be alarmed with a bunch of small roller bearings and some off shaped rectangular bearings fall out. They go under the synchronizer gears, and will have to be removed eventually. There should be 13 rollers and 3 rectangular ones.

To get the input shaft out (the top thing you see here with the bearing), you need to ‘drop’ the cluster gear downwards to disengage it from the input shaft gear, otherwise it can’t come out. To do this, we need to drive out this final shaft. You want to drive it from this side outward.

Here it is driven out towards the back (red arrow).
This causes the large cluster gear (which is all those gears you see, that’s one connected group of gears) to fall down to the bottom of the case, which now you can then just pull out the input shaft (left).
Take out the cluster gear (which will have some copper washers on either end that I forgot to photograph), and the only thing left (if you haven’t taken it out already) is the reverse/idle gear, which is loose since you already drove out that small shaft it was riding on.

You have now taken apart the transmission case! The case is now empty.
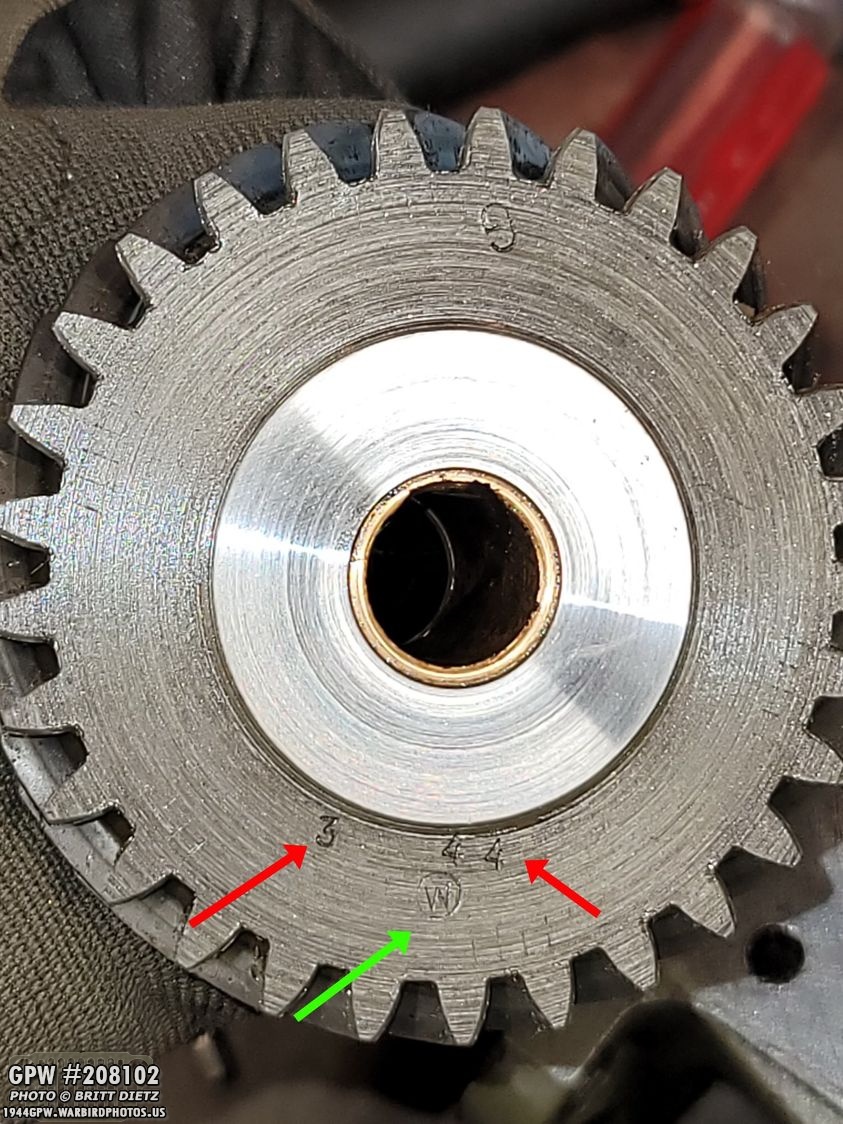
Now to check out everything. The clustergear isn’t Ford, but it is dated March of 1944, but it has a W in an O stamp (Willys Overland)… my Jeep is June 1944, so perhaps Ford was low on parts and used Willys clustergears?
I dipped the transmission housing into my bucket o’ fuel (a bucket of gasoline) for a few hours, then used a wire brush to clear paint/grime/grease.

On the top of the case (ignore the gears back in there, I shot this before I took everything out), there’s a date code on the lip with D 5 44 D. D = 4 = April 5 = Day 44 = Year. D = No one knows actually! So, April 5, 1944! Pretty cool and lines up with my Jeep’s timeline.

Here’s a look at all the parts I removed from the transmission all lined up how they should be in the case. It seems daunting, but once you start getting it apart, you realize there’s not many steps to it!

Looking at the cups that were on either side of the output shaft bearing (remember, only one is correct), one of them has an F stamp!

The bearing I pulled out is a Federal. This could be an original bearing, but they were made well after the war and could be a replacement.

Moving on to other things, I dipped the shifter cover in the bucket ‘o fuel for a few hours and started to clean it. The fuel does amazing stripping the paint to where you can just scrape it off. The bottom shot shows after I used the wire brush to remove the paint.
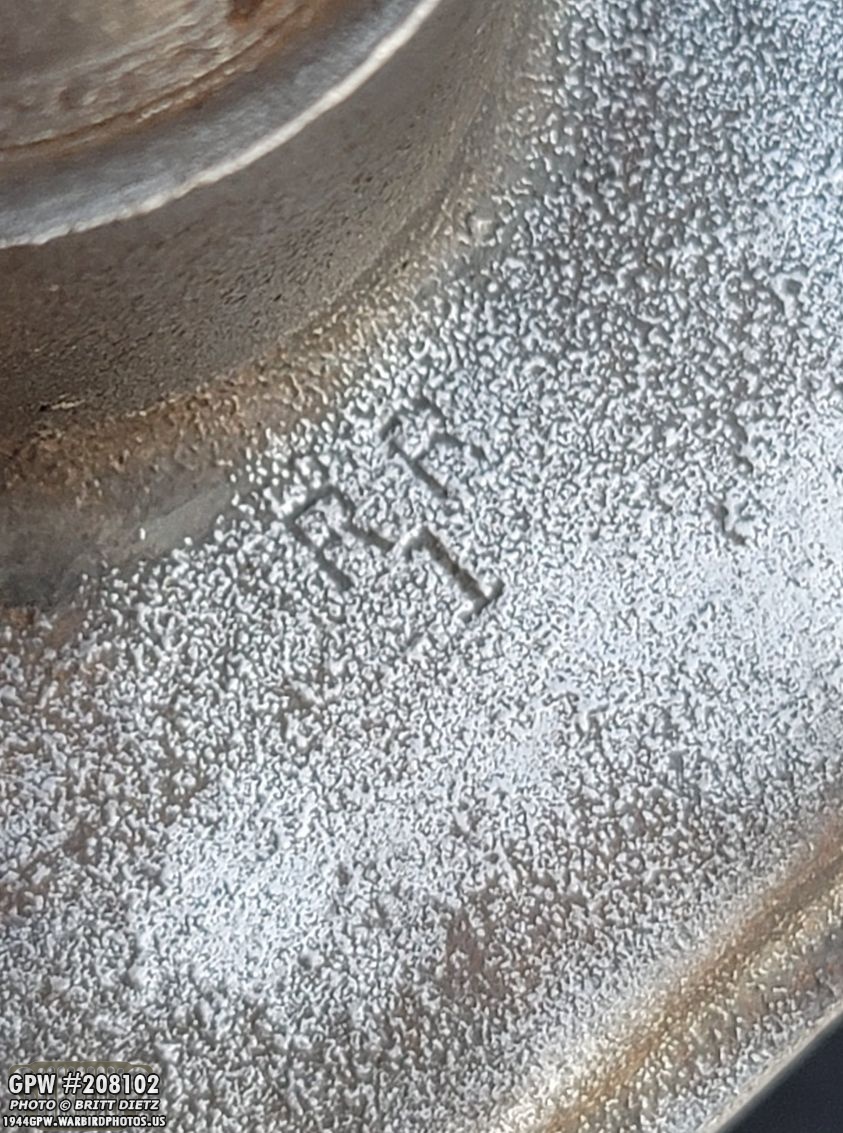
That’s when I discovered this RR and 1 marking on the top of the cover. No other markings on the top, JUST this. I looked online for any reference to this, and one person on G503 had a cover like this that he posted about back in 2014 (with no replies). His one had an odd F stamp, but mine does not. So my cover might possibly be Ford made and could go with the case, but it’s really hard to say for sure.
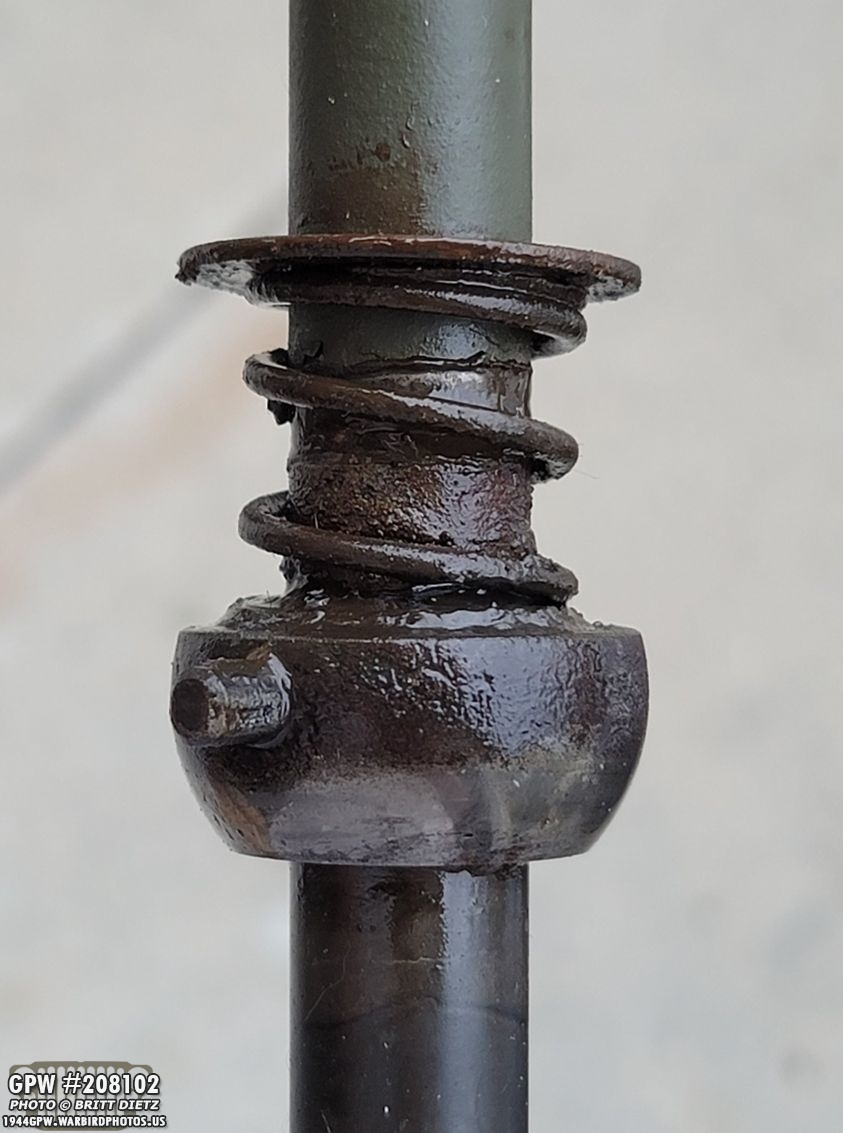
Looking at the main shifter caine, it’s in pretty good shape. The spring is still good, but someone put a washer on the top of the spring. Odd. I’ll remove that.

I’m jumping around a bit here, but now on to the crossmember. After some quick wire wheeling, I found a large F stamp that’s been wearing away. It’s under where the transmission case mount is attached, so that’s just been wearing this away for years.

On the underside of that crossmember, it was GROSS. Like 2/16 heigh with caked on crude from who knows how many decades of mud, dirt, oil, grease, etc etc etc. It took forever to wire wheel this stuff off. It liked to smear rather than come off.
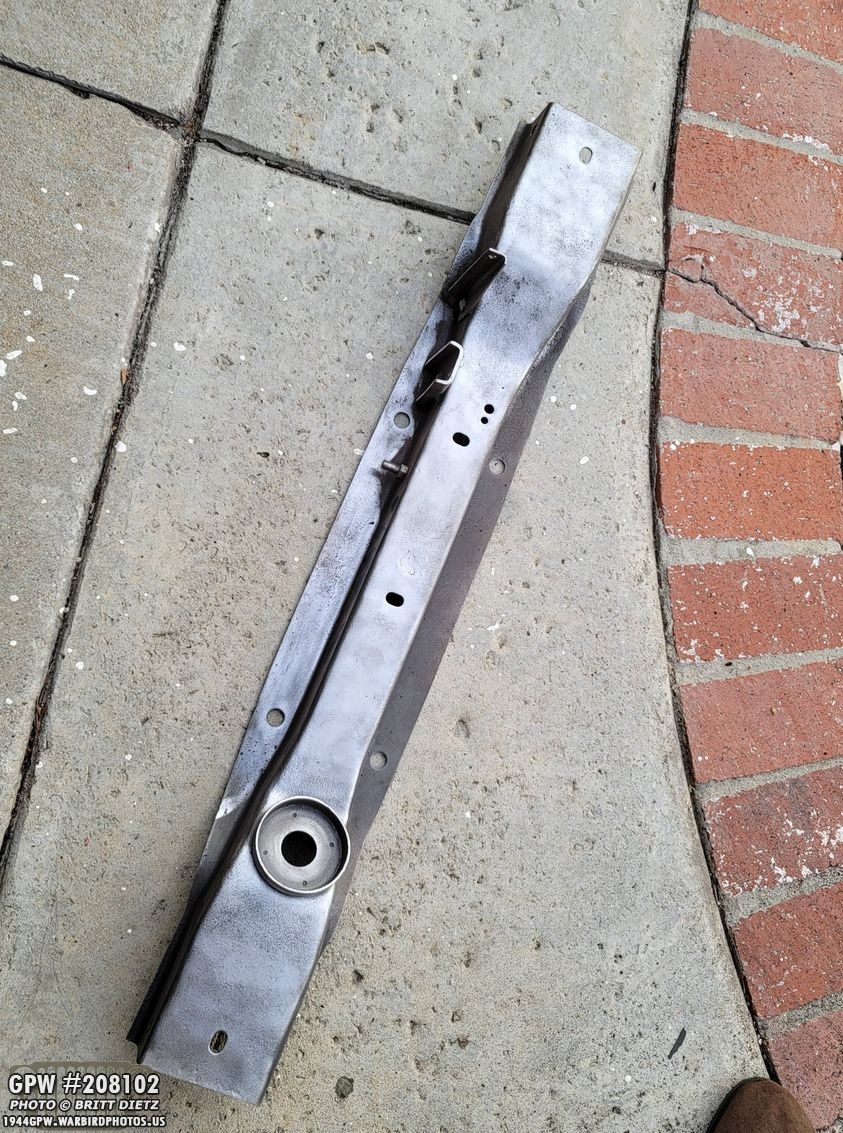
But, after a lot of work, I got the whole thing cleaned and back to looking metal. No damage, cracks, or bad rust.

After a quick session with the sandblaster, things are looking good!
The case looks brand new almost. Probably hasn’t looked this good since it was built in the factory.

I also noticed this very small F stamp on the shifter oil cup.

And a nice look at the cast GPW number and large F stamp.
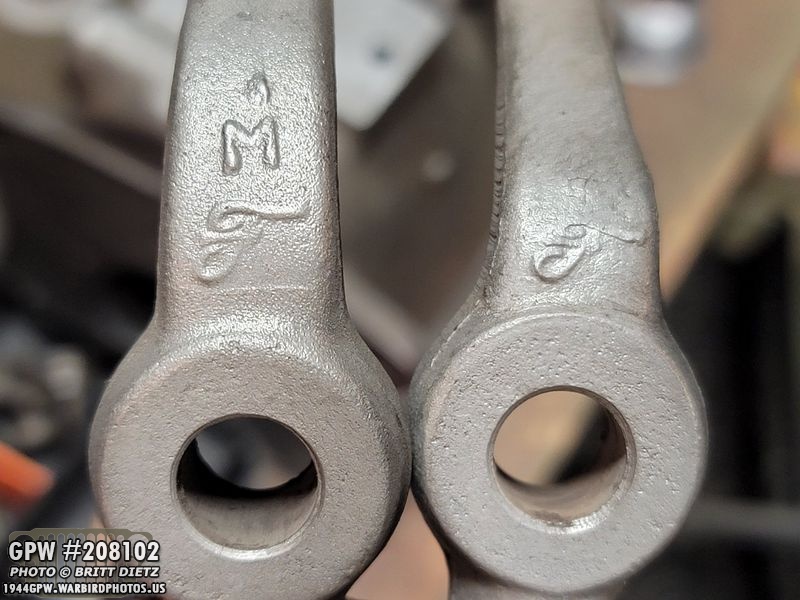
I also wanted to note that the two transfer case shifters have nice F stamps on them!

And looking at the transfer case (which I’ll get into in about two weeks), there’s a large F stamp and GPW number on the backside of the case!

One thing that’s helping, I’ve had a LOT of bolts and small parts I’ve removed during this whole process so far. Using one of these divided small parts cases, it’s been easy to keep them all together (and I’ve been keeping written notes of which items came from what). Very handy to have! I took this photo a bit early on, by the time I finished the transfer case disassembly, one entire side was filled and the other side a quarter filled!

So that’s it for this week! You could easily do everything in this update in one day, a few hours really. I spread it out over a few days along with a lot of inspecting of the various items I took off to see what needs to be replaced or not. Next week, I’ll start to take more of the gears apart, clean them up, get replacement items, and start painting things. Till next week!